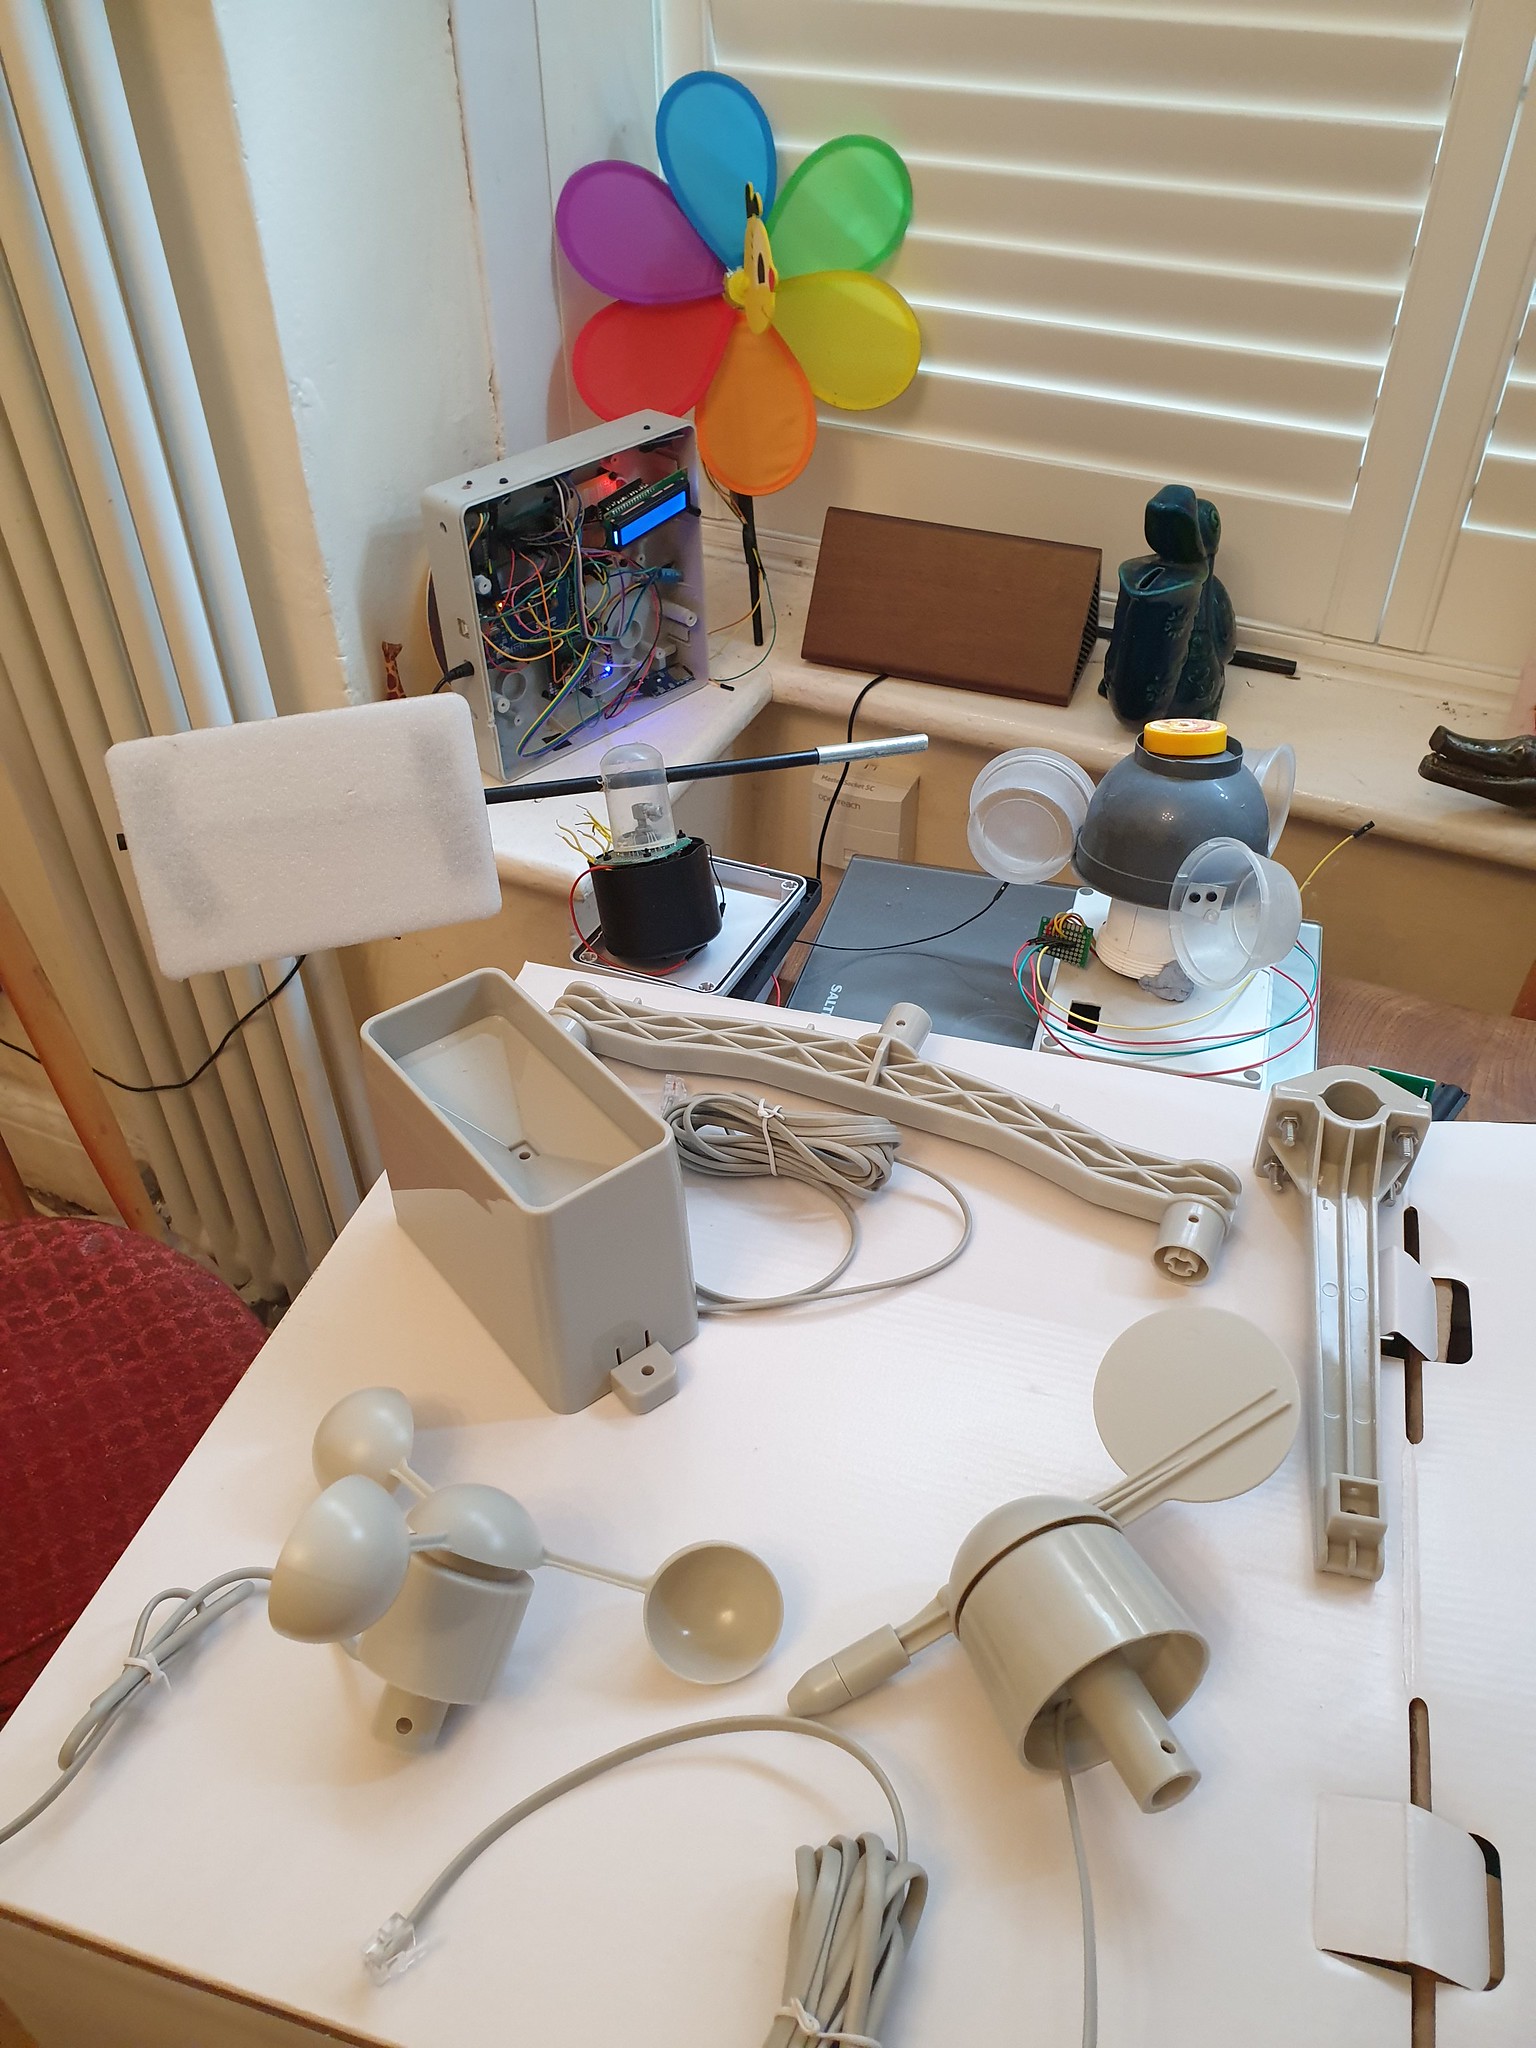
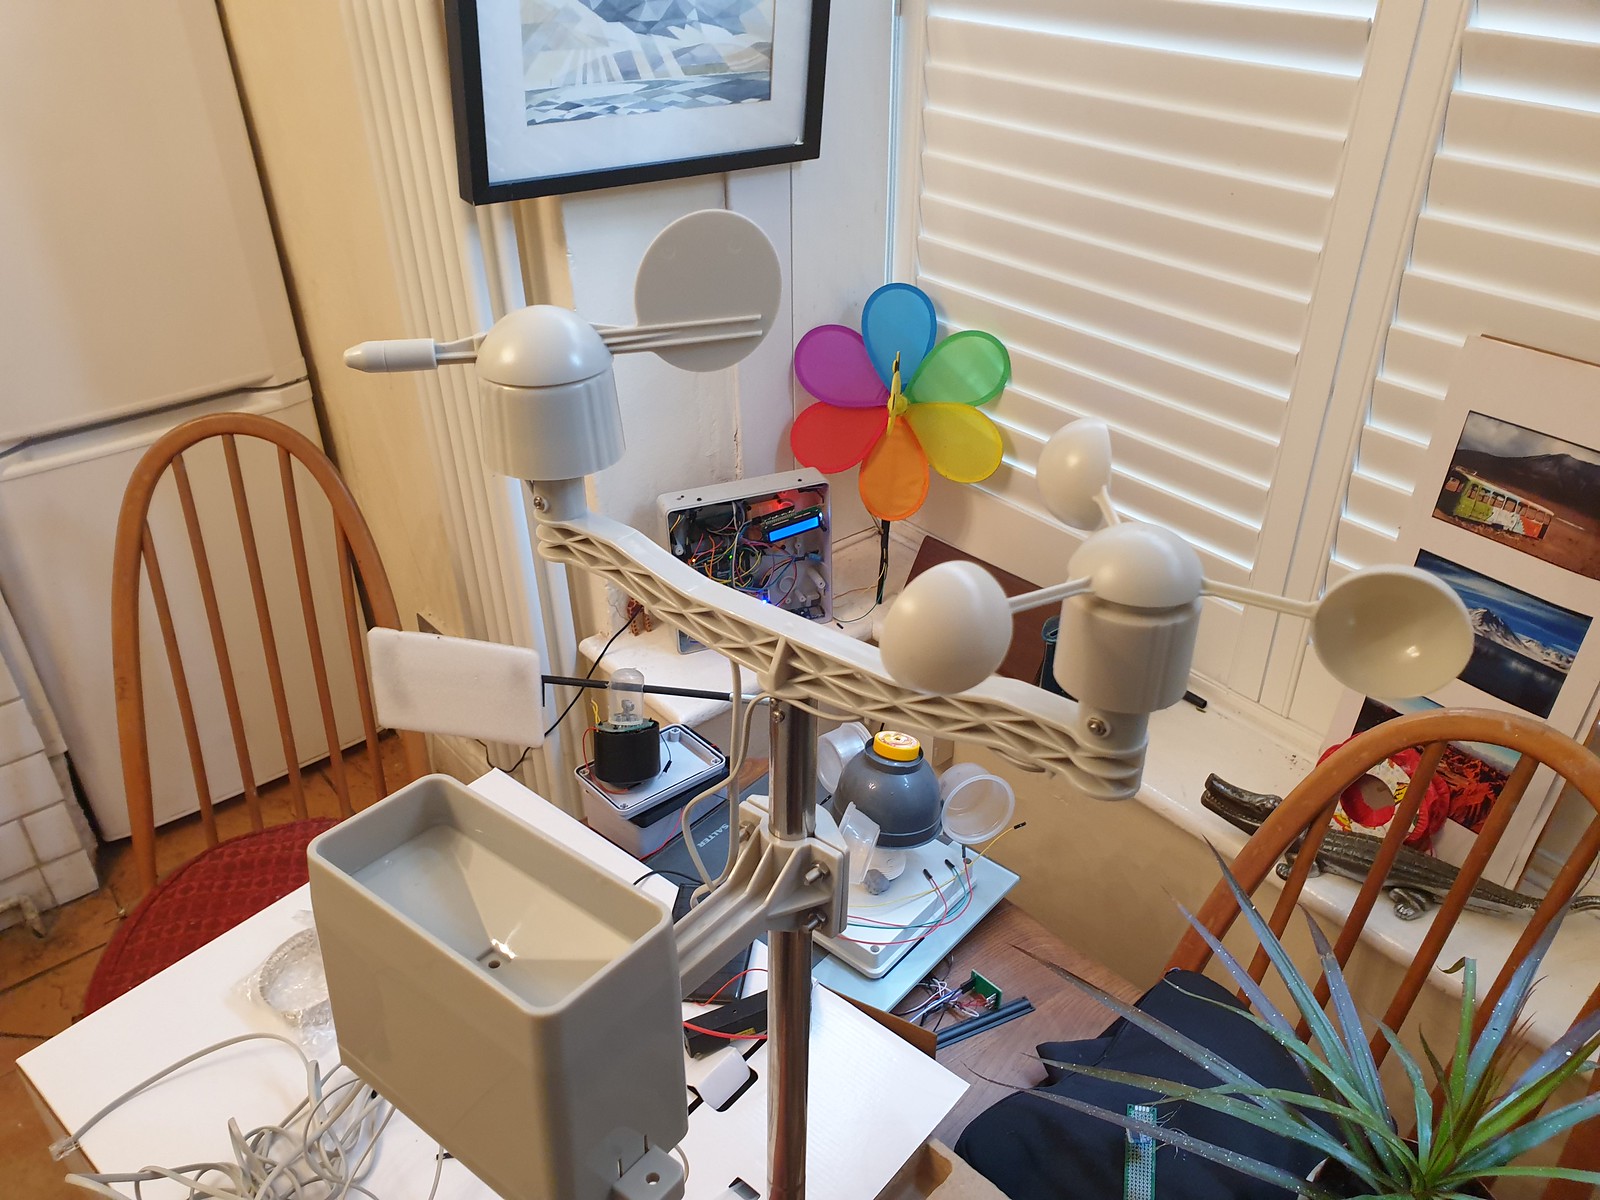
Wind and Rain sensor kit newly arrived from SparkFun Electronics to upgrade an Arduino Weather Station project.
SparkFun Weather Sensor Kit, DIY prototypes, Arduino Weather Station
Also pictured are earlier DIY prototypes – a childrens bee wind spinner with hall effect sensor to count rotations, an anemometer made from recycled plastic packaging utilising a IR Led optical rotary encoder and a wind vane with eight fixed directional magnetic switches.
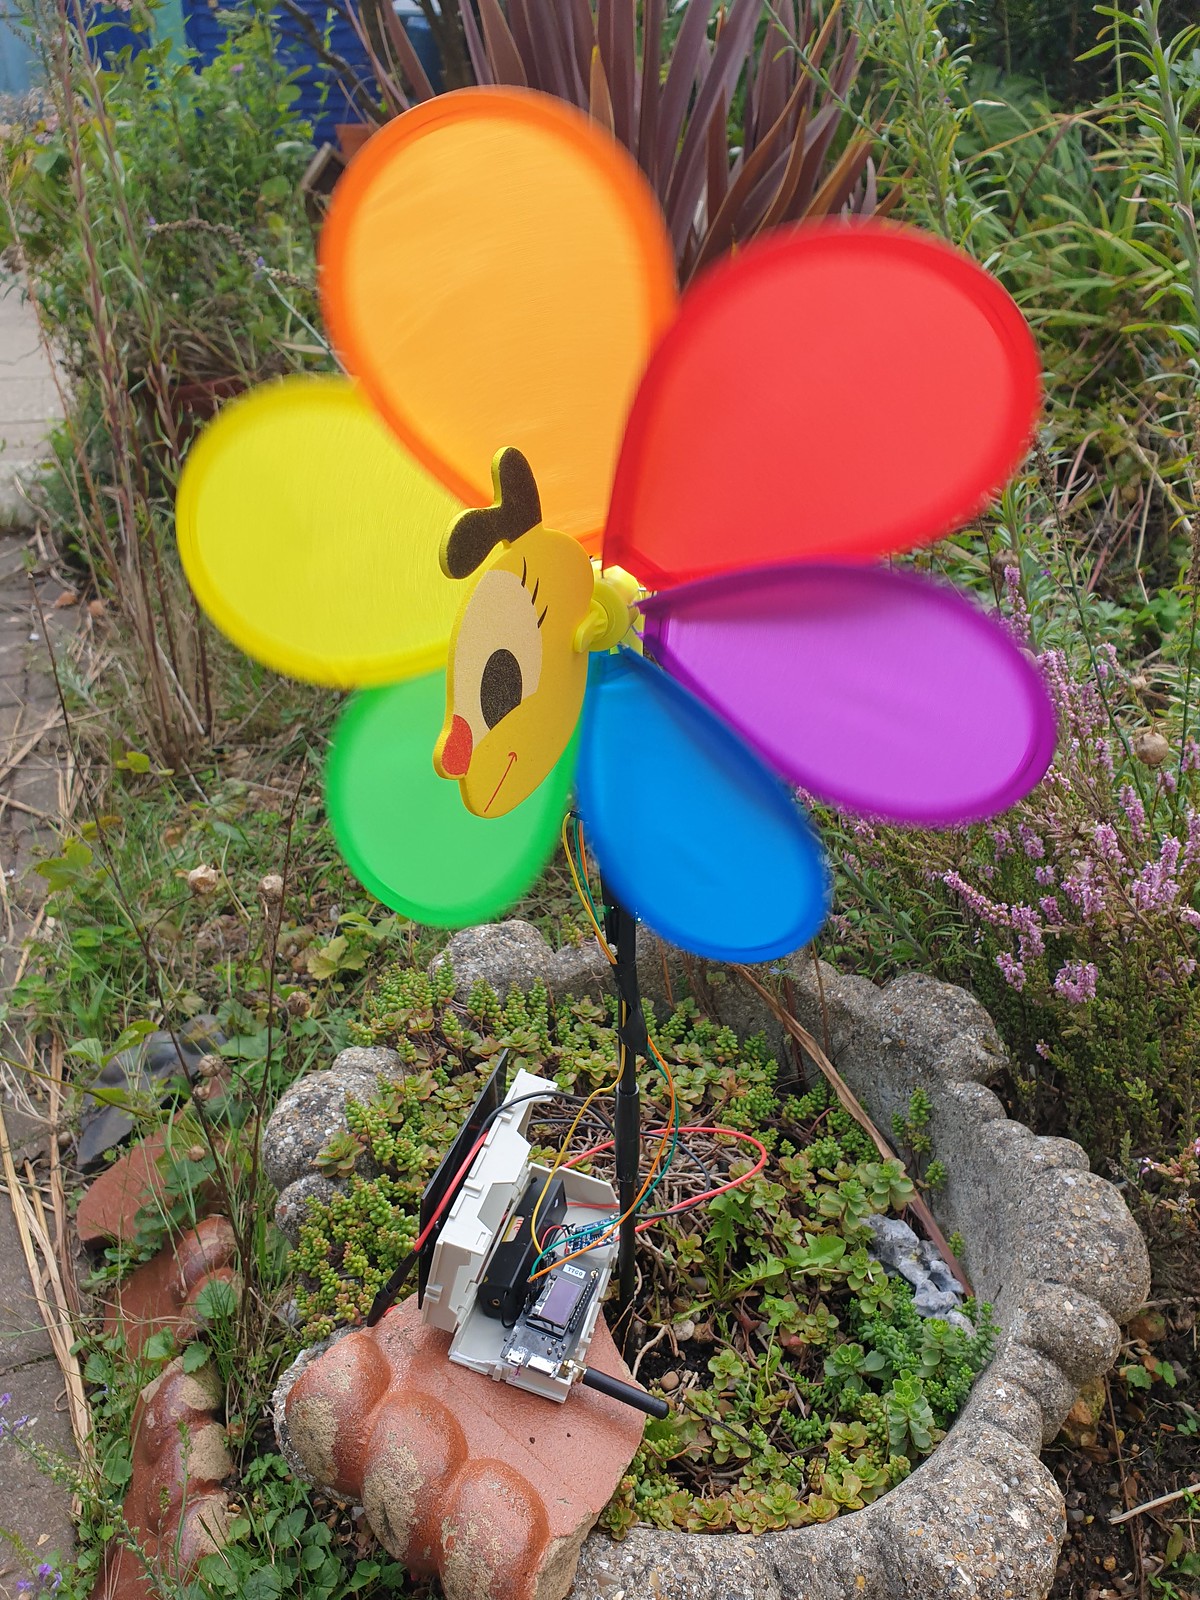
Bee Windmill Anemometer with ESP32 LoRa Transmitter running on single 3.3v Li-Ion cell.
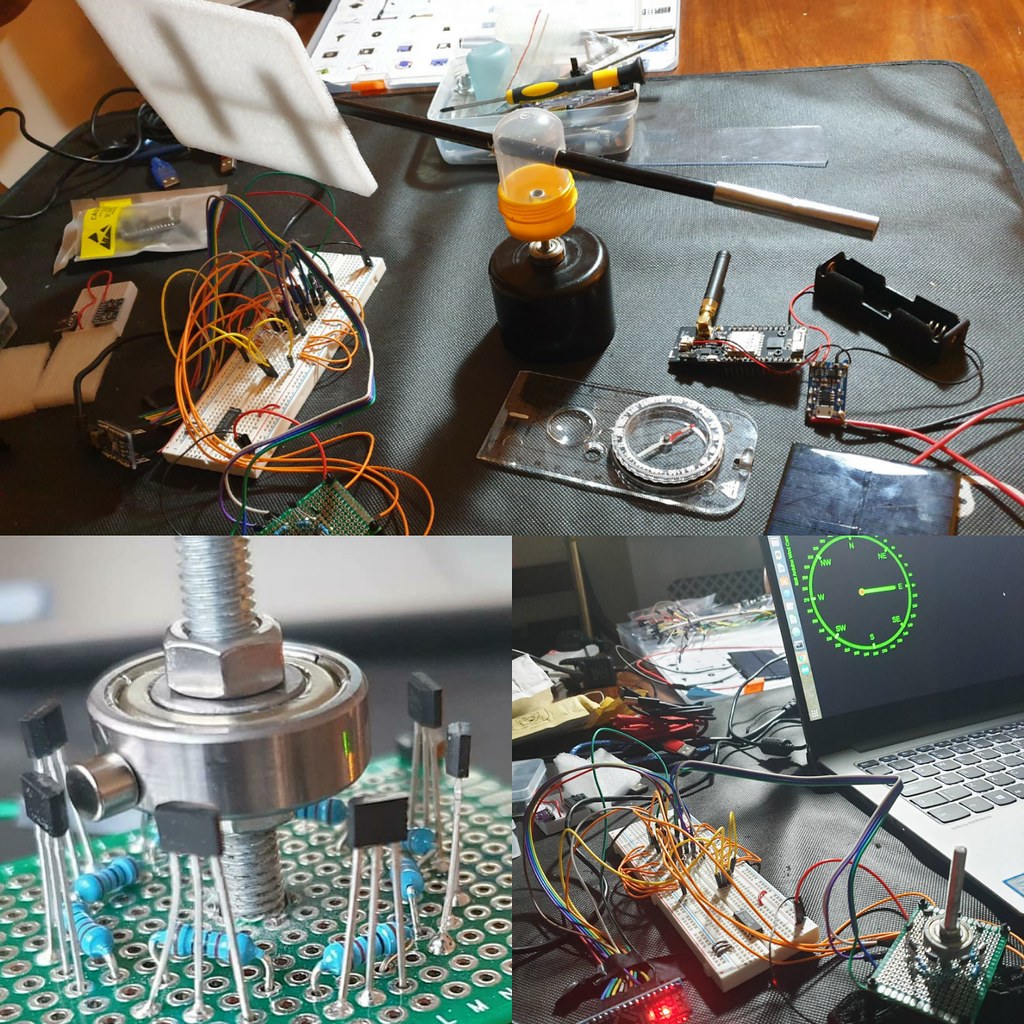
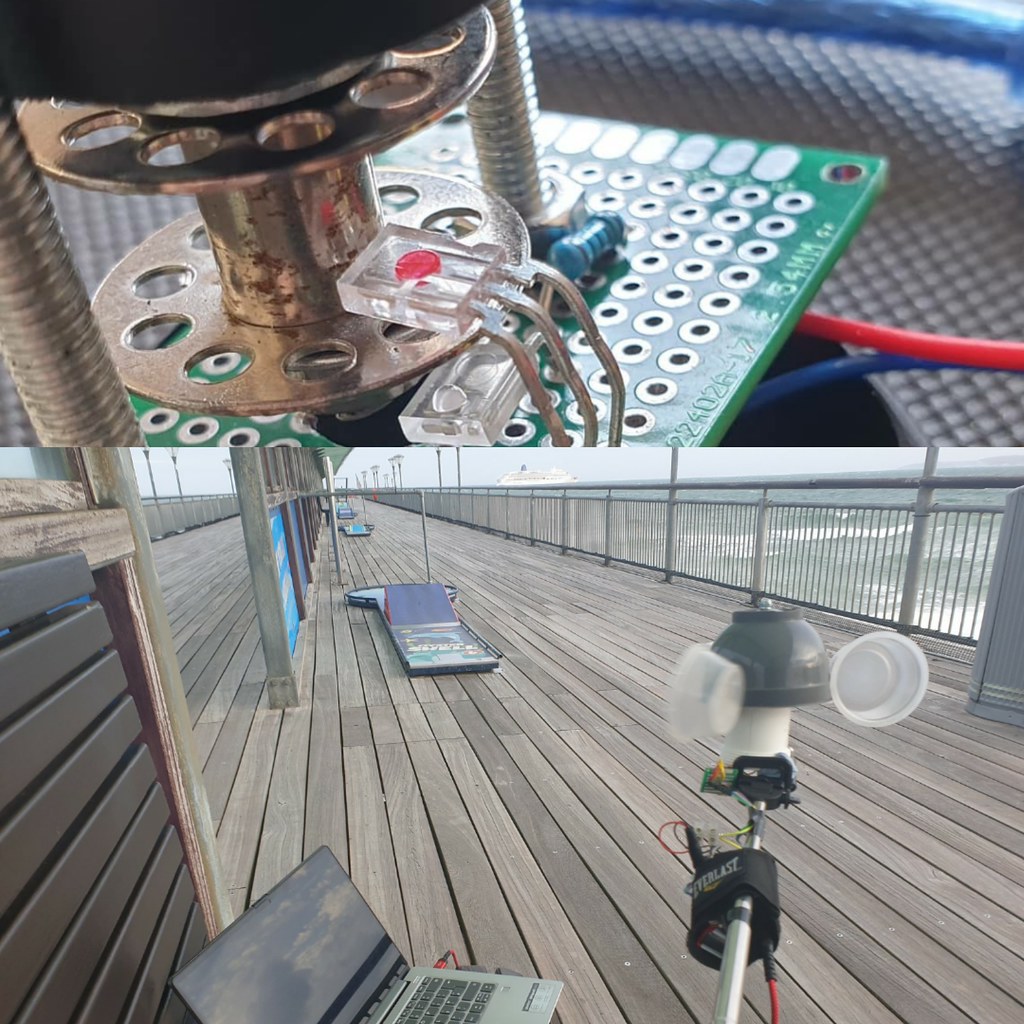
8 Durection WInd Vane with magnetic hall sensor array and WebSocket TCP web browser interface.ESP8266 Anemometer with optical IR Led sensor, wifi connectivity and D3.js websocket provisioned UI.
Weather station projects are a popular accessible introduction to microelectronics; a microcontroller and sensors can be found at low cost, modular hardware design results in easy assembly and open software platforms like Arduino IDE streamline packaging and deployment of code to devices.
Analysing real time or historical time series data, from weather sensors is a lot of fun. Frameworks like R Project for Math Stats: https://www.r-project.org/ ) and Python, Pandas, Numpy & Mathplotlib provide implementations of most alogirithms and convenient data structures for importing & manipulating data.
Techniques and methods are transferable and can be applied to other domains or ontologies – finanicial, accounting data for example.
With advent of 3d modelling & printing it is also feasible for an enthusiast to design and fabricate via a 3d printer custom sensor components, perhaps using template models downloaded from repos like ThingiVerse.
In competition marine OpenWind are defining what smart network connected sensors can achieve utilising Bluetooth LE to make near real time wind data available on smartphone.
Assembled SparkFun Weather Sensor Kit
Ideal for enthusiast or educator SparkFun Weather kit comes wihout circuitry, microcontroller or software. An add-on PCB designed for use with Arduino / ESP32 can be purchased or Datasheet Technical Specs provide reference sensor circuit designs, not significantly complex due to use of magnetic reed switch and variable resistance technology.
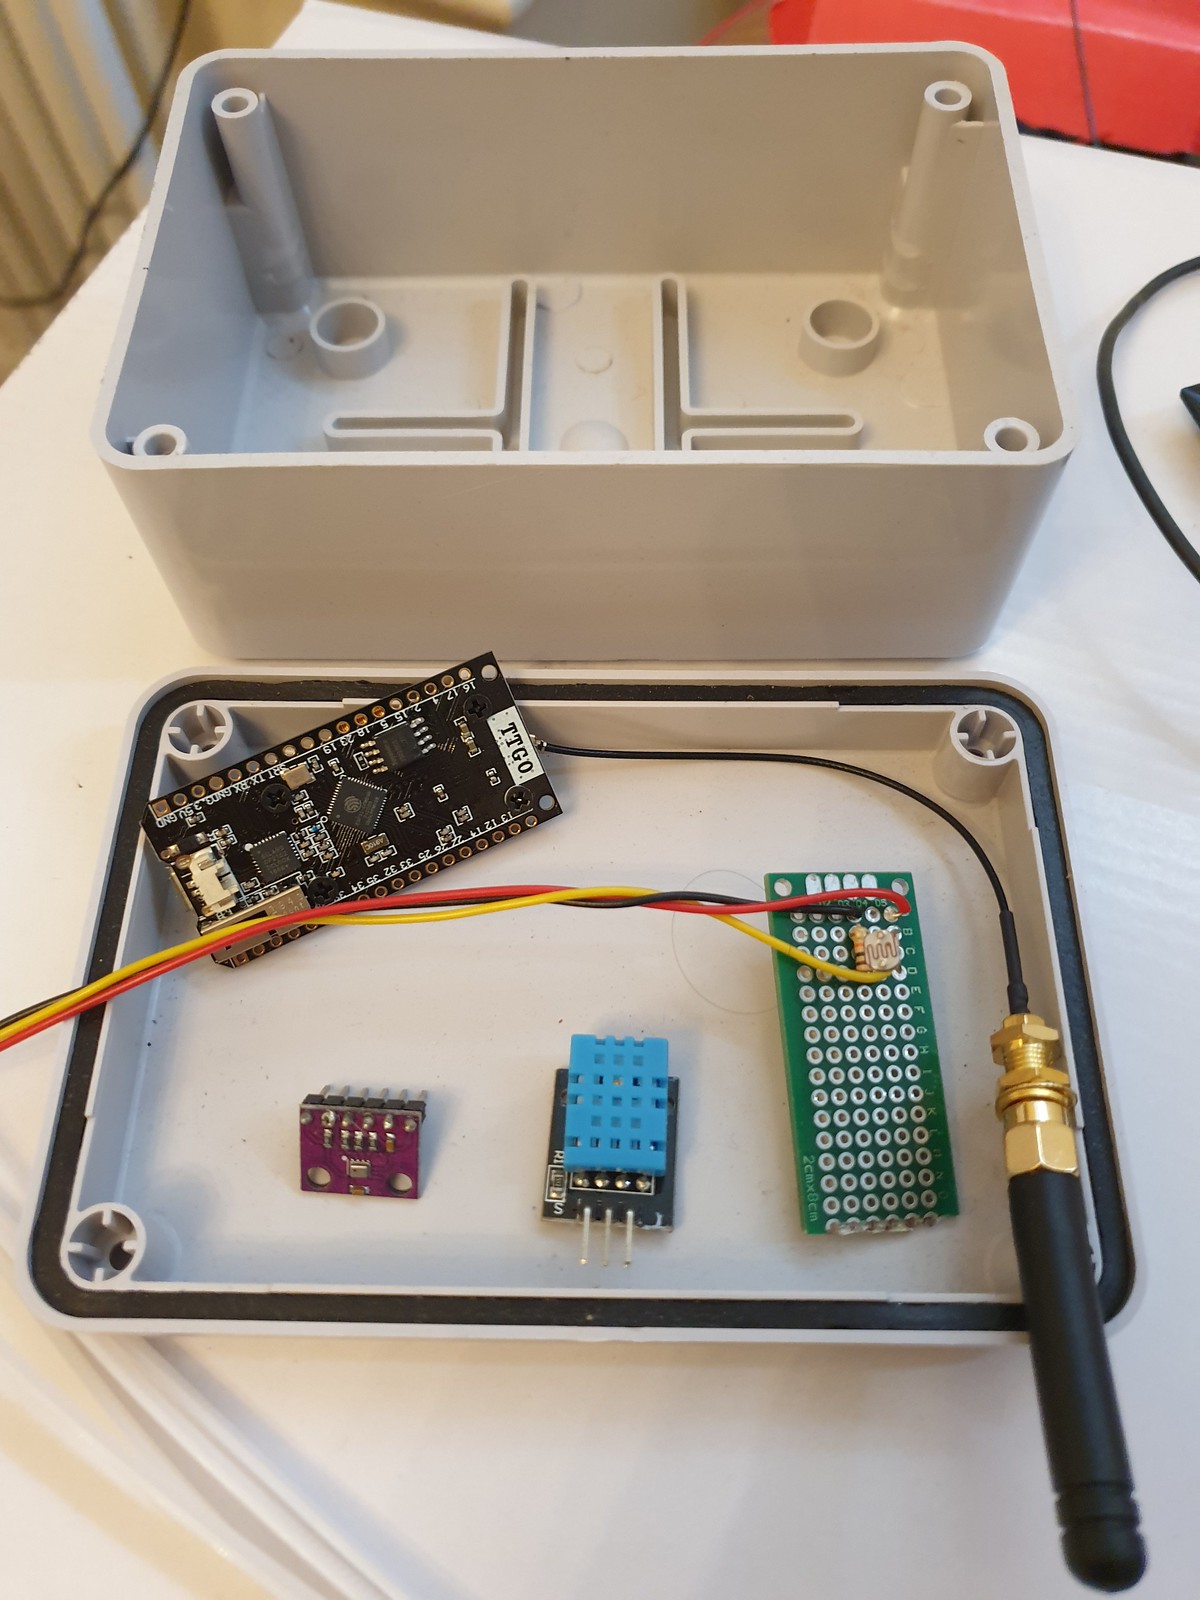
MCU Sensor Control & Relay Unit – IP67 Weather Proof Enclosure, ESP32 TTGO LoRa microcontroller, light, temperature and air pressure sensors.
Traditionally 433MHz RF has been used for base station to transmitter devices. A popular project is to use Arduino, a cheap 433Mhz receiver and a library to read data from a commercial weather station designed for use with manufacturers display, enabling this data to be provisioned to the cloud.
For data transmission non GPRS (cellular) options include Bluetooth LE (range ~100 metres) or LoRa (Long Range Low Power Network – range between 300 – 10km depending on antenae) offering cableless wireless connectivity allowing remote sensor situation with no associated network costs.
At data layer WebSockets and MQTT for IOT devices are challenging serial protocols as defacto lightweight, reliable & easy to implement transport relays.
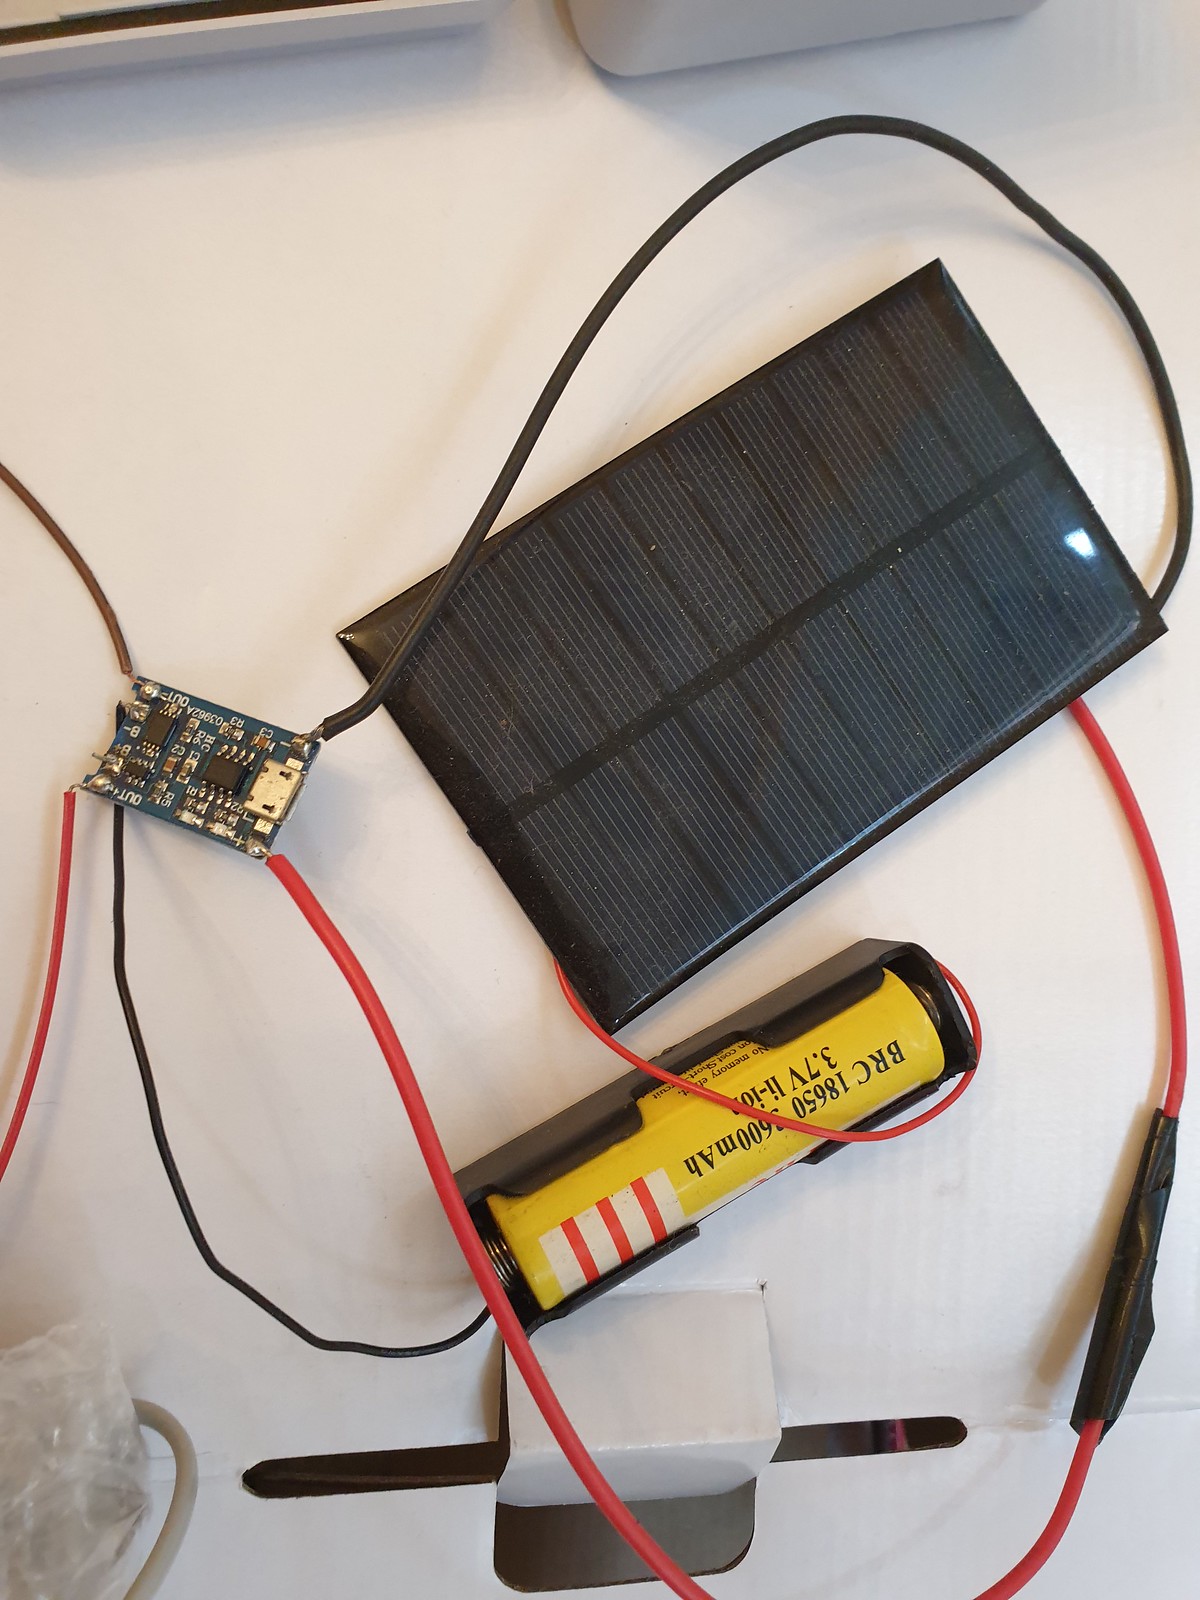
Apart from range and connectivity goals of low power consumption for efficient and long battery running time combined with solar charging enable devices to run standalone for long periods.
Is a single 3.3v Li-Ion Battery Cell Sufficient? TP405 Charging Module & Solar Panel
Weather Stations have applications beyond meteorology in smart agriculture, industrial, safety monitoring and for wind or wave based leisure pursuits.
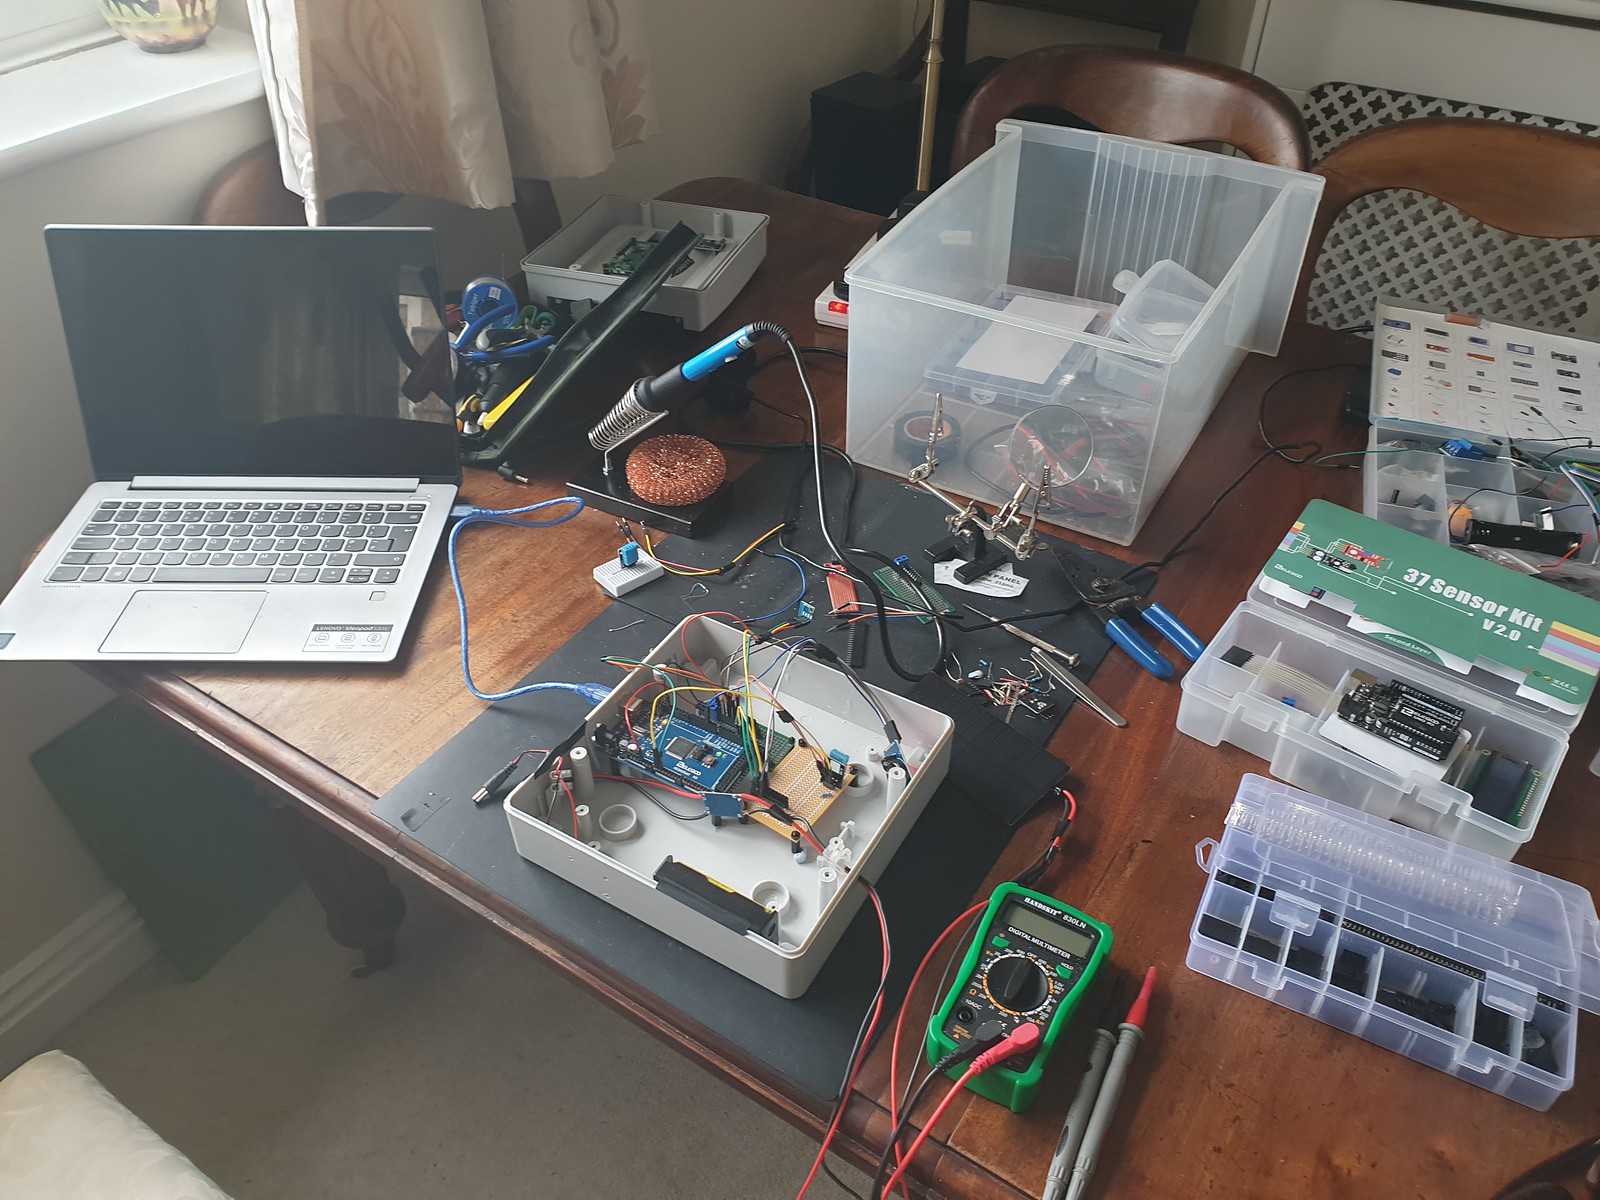
Assembling DIY Arduino Mega Weather Station v1.0
More generally Internet of things wireless networked smart sensor platforms can be used for many purposes and combined with AI and Machine Learning algorithms useful insight and patterns within data can be analysed, classified and predicted.
SparkFun Smart ETextiles & Conductive Thread Kit
Personally, I really enjoyed SparkFun Arduino LilyPad e-textile, smart fabrics and conductive thread kit, so looking forward to now spinning up the Weather Station sensors!
Internet of things devices can be networked wirelessly over internet and integrate easily with cloud, mobile and web applications.
WebSockets ( RFC6455 ) run on a variety of platforms including embedded systems and web browsers enabling low latency bidirectional binary socket communication over TCP/IP.
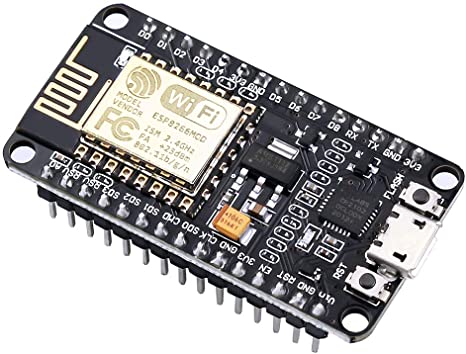
ESP8266 is a low cost Wi-Fi micro-controller compatible with Arduino open-source electronics framework designed for networked sensor, robotics and micro-electronic control applications.
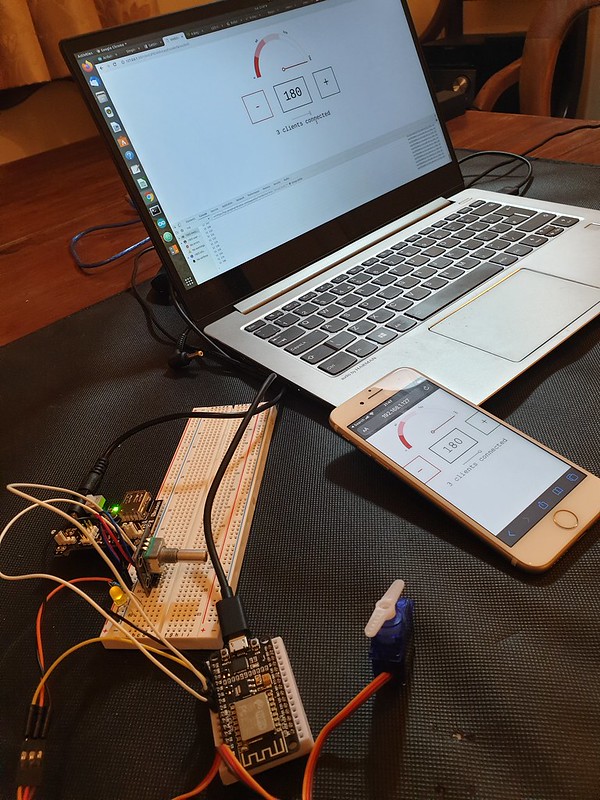
A microservo controlled by ESP8266 with web & mobile interface
WebSocket MicroServo
In a simple example a micro-servo reports position data and is controlled via a potentiometer (rotary encoder), web and mobile interfaces.
This tutorial demonstrates:
Microservo / Potentiometer GPIO control
ESP8266 WebSocket Client
Binary format Messaging
Python WebSocket Library to synchronise state between clients
Responsive HTML5 / Javascript Browser Control Interface
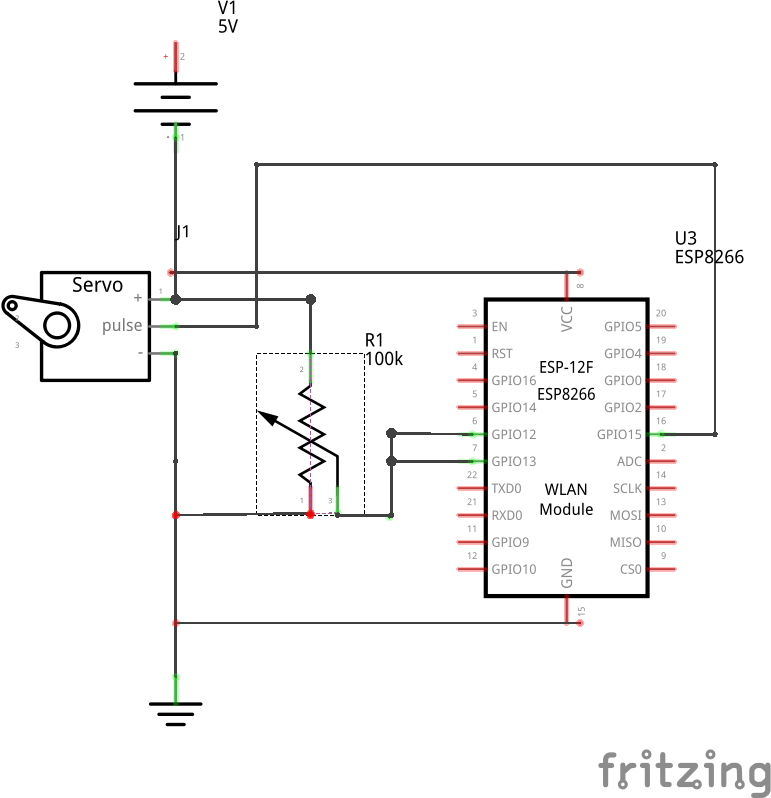
Microservo power is provided by an external regulated 5v DC power supply sharing a common ground connection to microcontroller.
Servo library initialisation and global variables –
#include <Servo.h>
int servoPin = 15;
int angle; // current angle (degrees)
int servoStartAngle = 90; // initial position
int limit = 90; // range of servo in degrees
Servo Servo1;

// in setup()
Servo1.attach(servoPin);
rotateServo(0);
Servo position is set in a function by passing angle in degrees as a parameter –
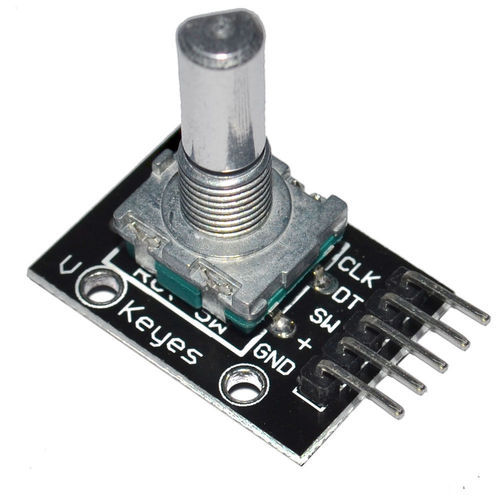
Potentiometer, a type of incremental rotary encoder based on variable resistance, allows relative rotary motion to be tracked, 2 out-of-phase output channels indicate direction of travel.
#define outputA 12 // Rotary Encoder #1 CLK
#define outputB 13 // Rotary Encoder #2 DT

int counter = 0; // rotary encoder incremental position
int aState; // rotary encoder state comparator
int aLastState;

void setup() {
   pinMode(outputA,INPUT);
   pinMode(outputB,INPUT);

   aLastState = digitalRead(outputA);
}
Rotary encoder CLK and DT pins are compared to determine direction of rotation. Calling map() converts counter (relative position) to angle –
void readRotaryEncoder()
{

  aState = digitalRead(outputA);

   if (aState != aLastState){
     // If the outputB state is different to the outputA state, that means the encoder is rotating clockwise
    if (digitalRead(outputB) != aState) {
      if (counter < limit)
      {
        counter ++;
        angle = map(counter, -90, 90, 0, 180);
        rotateServo(angle);
      }
    } else {
      if (counter + limit > 0)
      {
        counter --;
        angle = map(counter, -90, 90, 0, 180);
        rotateServo(angle);
      }
    }
  }
  aLastState = aState;
}
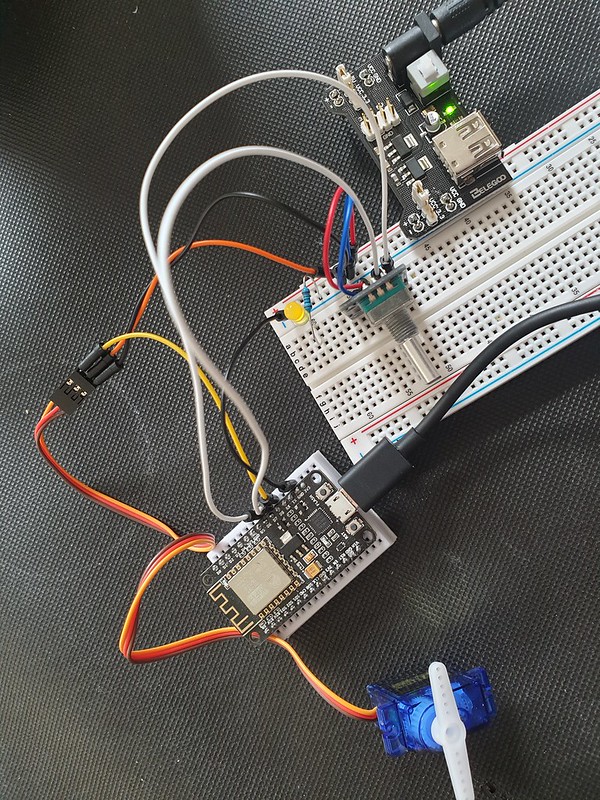
ESP8266 microcontroller, Potentiometer (Rotary Encoder), Microservo, 5v DC power supply
Websocket Binary Message Framing
WebSocket protocol natively supports binary framed messaging, offering a compact lightweight format for fast and efficient endpoint messaging.
To report and update microservo position command messages are passed between control interfaces and microcontroller as binary data.
A Python service running on server creates WebSocket and maintains and synchronises shared application state between connected clients.
In web browser user interface, Javascript also has native support for (un)packing binary data.
Data Serialisation
A C struct data_t encapsulates two fields – “cmd” (unit8_t) and “value” (int) – two commands are defined, one to report servo position and another to set a new position, value represents an angle.
To assist serialisation data_t is wrapped in a packet union –
// data message
typedef struct data_t
{
  uint8_t cmd;
  int value;
};

// message packaging / envelope
typedef union packet_t {
 struct data_t data;
 uint8_t packet[sizeof(struct data_t)];
};

#define PACKET_SIZE sizeof(struct data_t)

#define CMD_SERVO_ANGLE 12 // command to report servo position
#define CMD_SERVO_ROTATE 13 // move servo to a specified position
Instances of data structs are created representing send and receive messages.
// send / receive msg data structures
union packet_t sendMsg;
union packet_t receiveMsg;

// messaging function prototypes
void readByteArray(uint8_t * byteArray);
void writeByteArray();
void printByteArray();

// buffer
uint8_t byteArray[PACKET_SIZE];
Methods allow struct data to be written and read from byte array buffer –
// read bytes from buffer
void readByteArray(uint8_t * byteArray)
{
  for (int i=0; i < PACKET_SIZE; i++)
  {
    receiveMsg.packet[i] = byteArray[i];
  }
}

// write data to buffer
void writeByteArray()
{
  for(int i=0; i<PACKET_SIZE; i++)
  {
    // msg into byte array
    byteArray[i] = sendMsg.packet[i];
  }
}
ESP8266 Wifi / Websocket Setup
Details for setting up ESP8266 wifi can be found here.
ESP8266 Websocket library is added by including headers, defining server IP address / port / path and creating a WebSocketsClient class instance.
void setup() {
    ...

    // server address, port and URL
    webSocket.begin(ws_server, ws_port, ws_path);

    // event handler
    webSocket.onEvent(webSocketEvent);

    // use HTTP Basic Authorization (optional)
    //webSocket.setAuthorization("user", "Password");

    // try again if connection has failed
    webSocket.setReconnectInterval(5000);
WebSocket – Message Receive
Event of type “WStype_BIN” defines handling when a binary format message is received, size is reported and hexdump() displays message contents –
In setServoPosition() received byte array is de-serialised into message data structure. Angle field is used to update servo and potentiometer position.
Servo position is reported by populating sendMsg data structure, converting to byte array and calling webSocket.sendBIN() passing a pointer payload data and size.
// send servo position to Websocket server
void sendServoPosition()
{
  sendMsg.data.cmd = CMD_SERVO_ANGLE;
  sendMsg.data.value = angle;

  // write message to buffer
  writeByteArray();

  webSocket.sendBIN(byteArray, PACKET_SIZE);
}
Server Side – Python WebSocket (WS) Library
A simple WebSocket server implemented in Python v3x is tasked with text / binary message exchange, tracking connected clients and maintaining shared application state.
WebSocket server event loop is started by passing function/method name, IP address and port –
Python struct library allows packed binary bytes representing C structs to be unpacked as native python data types.
Format specifier “Ii” represents a message containing an int and unsigned int.
    try:
        async for message in websocket:
            print('Sec-WebSocket-Key: '+websocket.request_headers['Sec-WebSocket-Key'])
            print('MessageType: '+str(type(message)))
            print(message);
            if isinstance(message, (bytes, bytearray)):

                tuple_of_data = struct.unpack("Ii", message)
                cmd = tuple_of_data[0]
                value = tuple_of_data[1]
                STATE["value"] = value
                await notify_state()
    except Exception as e:
        print(e);
    finally:
        await unregister(websocket)
Connected WebSocket clients are push notified (synchronised) when position data (state) is updated –
async def notify_state():
    if USERS:
        binary_data = struct.pack("Ii", 12, STATE['value'])
        await asyncio.wait([user.send(binary_data) for user in USERS])
WebSocket Browser Client – Binary Messaging in JavaScript
Web Interface is responsive and runs in mobile and web browser clients.
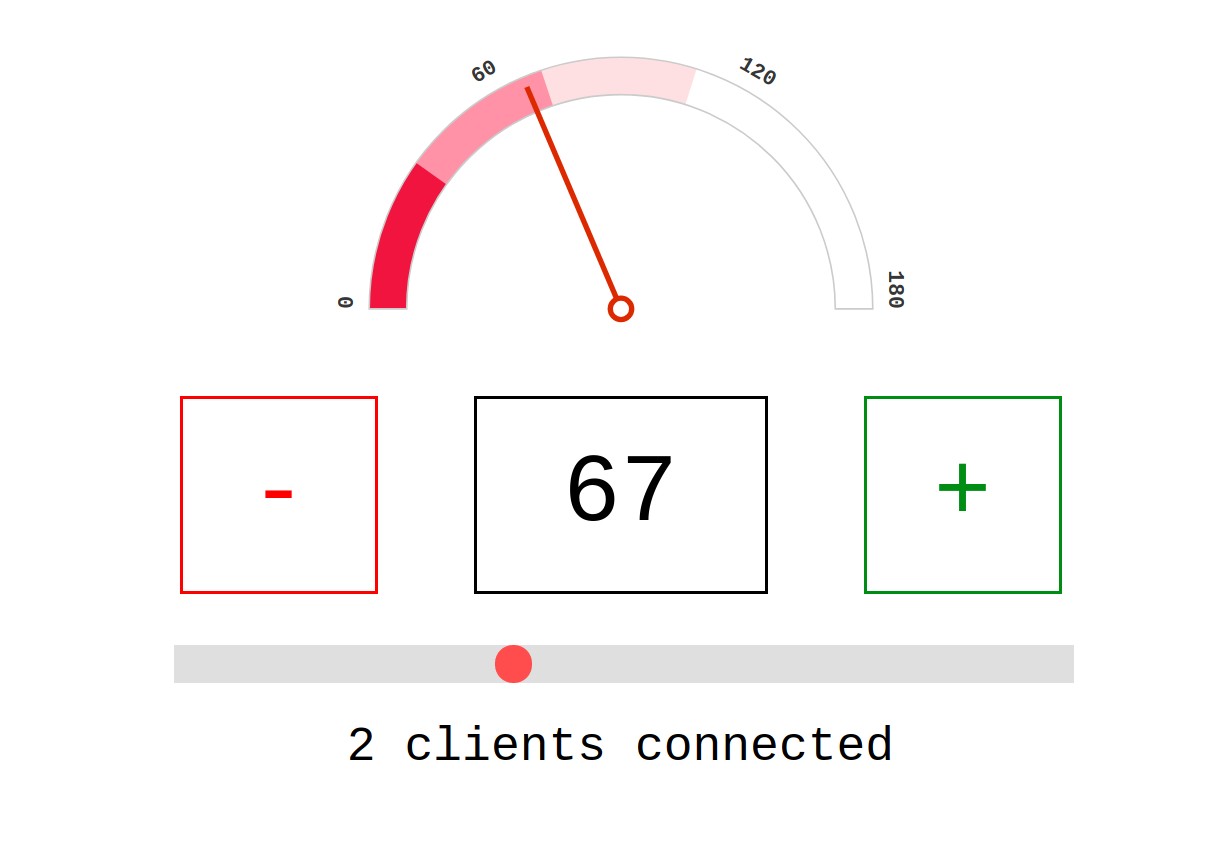
A radial D3.js radial gauge displays current angle. HTML5 buttons (divs) and slider control allow position to be updated.
Web / Mobile Interface provisioned by WebSocket (RFC6455)
JavaScript WebSocket onmessage function handles decoding of binary framed data.
A FileReader object is used to convert Blob to ByteArray in an asynchronous function, with flow control provided by a promise (future). TypedArray Uint8Array is used to extract 4 byte int and unsigned int command and value data fields –
websocket.onmessage = function (event) {
    if (event.data instanceof Blob)  // Binary Frame
    {
      async function readBinaryData(blob) {
          let promise = new Promise((res, rej) => {

            var fileReader = new FileReader();
            fileReader.onload = function(event) {
                var arrayBuffer = event.target.result;
                res(arrayBuffer);
            };
            fileReader.readAsArrayBuffer(blob);
          });

          // wait until the promise returns us a value
          let arrayBuffer = await promise;

          var v = new Uint8Array(arrayBuffer);
          // v[0] = cmd, v[4] = value
          //console.log(v[0] + " " + v[4]);

          // update UI elements
          value.textContent = v[4];
          angleSlider.value = v[4];
          gauges.forEach(function(g) {
              g.gauge.update(v[4]);
          });
      };

      readBinaryData(event.data);
Conclusion
WebSockets offer significant advantages over HTTP request/response polling techniques for real time data exchange, principally overhead of opening connection should occur only once per client.
Message push notify model, lightweight protocol framing, client libraries for embedded devices and native support in modern web browsers make this protocol well suited to real time Internet of Things data message exchange.
While underlying TCP provides message ordering and re-transmission (of failed packets), higher level application abstractions: guaranteed message delivery (at least once, at most once), message acknowledgements and queue / persist / forward (to offline clients) are not specified by WebSocket specification.
Similarly, TLS SSL can be used at network layer to encrypt data transmission (WebSocket Secure WSS), but client authentication / authorisation is not handled by WebSocket protocol, meaning a strategy for token or key based client identification (OAuth for example) must be considered for secure use cases.
Event driven implementations supporting asynchronous non-blocking IO result in efficient, well structured and modular code with handlers dedicated to specific tasks.
Factors influencing choice between binary framing and text format messages (field delimeted, JSON) include legibility, convenience, compactness and parsing overhead. Binary format introduces complexity due to differences in compiler / platform / network architectures and data type implementations between programming languages.
MQTT is a lightweight messaging protocol suitable for embedded and IOT devices.
Websockets ( RFC6455 – https://tools.ietf.org/html/rfc6455 ) is socket programming for internet, an evolution of browser / web server HTTP enabling real-time bidirectional data exchange and binary messaging.
How do we interface a MQTT enabled IOT sensor device with a web browser interface displaying a real time graph chart?
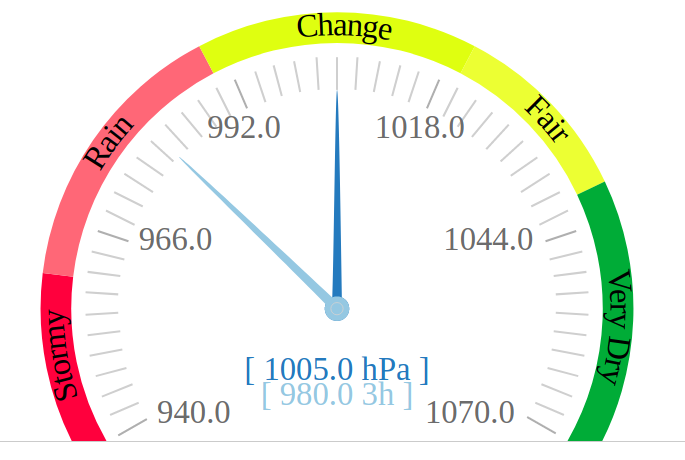
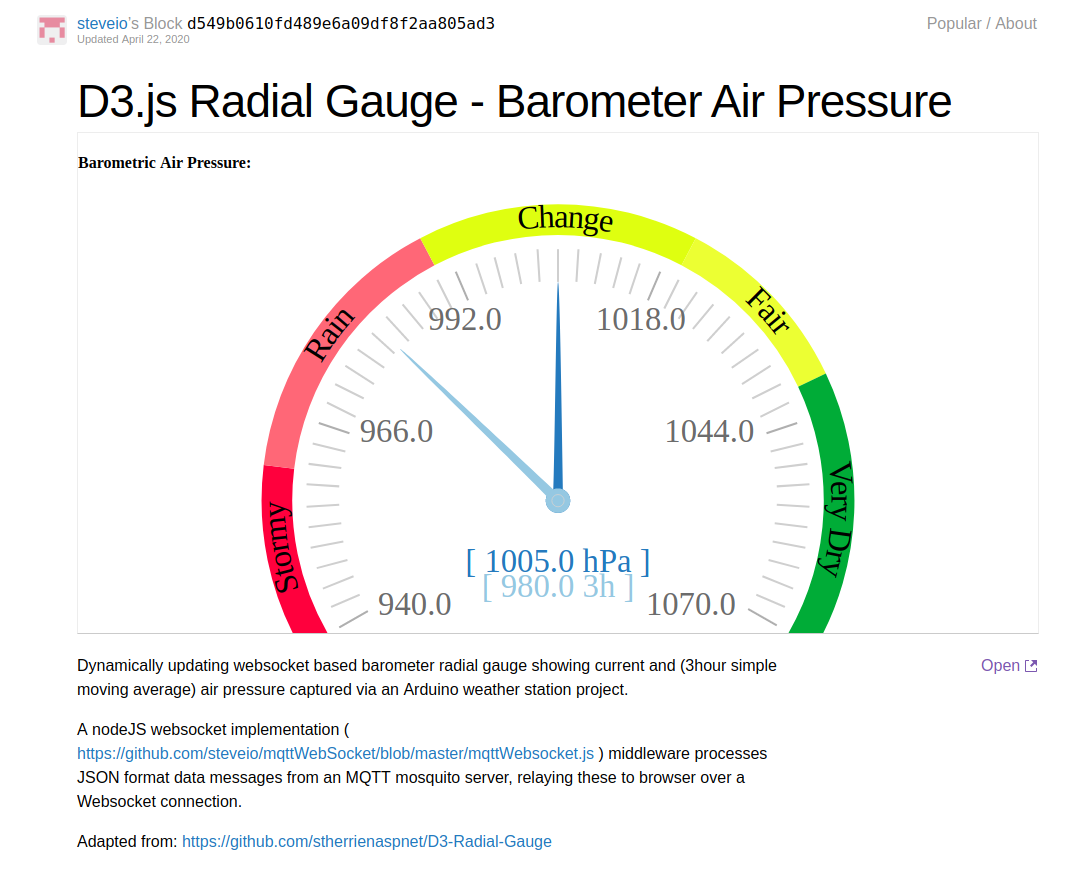
A real time web based barometric air pressure chart interface created with WebSockets and D3.js
Introduction to WebSockets – Real Time TCP Sockets for Internet
With modern browser engines and responsive web UI technologies built on HTML5, SVG and JavaScript frameworks, sophisticated visualisation, display and dashboard reporting capabilities have emerged.
Responsive Web UI runs in any browser installed device – laptop, dekstop, tablet or mobile, without need to install additional software or prepare application code for specific device architectures.
HTTP browser clients essentially implement a polling request/response technique for retrieving and updating HTML format webpages.
Due to need to establish a connection for each new request, HTTP is not well suited to real time or high volume messaging, charting or visualisation applications.
Although AJAX (asynchronous JavaScipt XML) and REST, SOAP API programming overcome this to a certain extent these methods are relatively inefficient for some use cases due to protocol overhead.
With Websockets, TCP network socket programming becomes possible in a browser client application.
Clients can establish a network socket connection, this channel remains open and two-way data exchange including binary messaging formats takes place.
Sockets are well established in UNIX and Windows OS client/server programming, but are relatively new to the web.
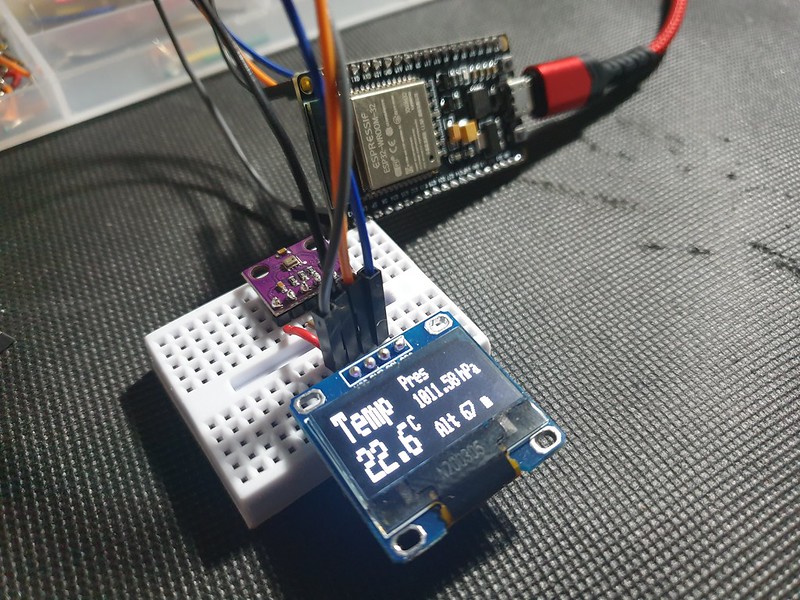
Arduino ESP32 Barometer Sensor MQTT Device
An ESP32 microcontroller with BMP280 environmental sensor and OLED LCD display
An environmental sensor based on an Expressif ESP32 micro-controller and BMP280 Bosch sensor reads air pressure, temperature and altitude –
#include <Adafruit_BMP280.h>

Adafruit_BMP280 bmp;

void setup() {

  if (!bmp.begin()) {
    Serial.println(F("Could not find a valid BMP280 sensor, check wiring!"));
    while (1);
  }

  /* Default settings from datasheet. */
  bmp.setSampling(Adafruit_BMP280::MODE_NORMAL,     /* Operating Mode. */
                  Adafruit_BMP280::SAMPLING_X2,     /* Temp. oversampling */
                  Adafruit_BMP280::SAMPLING_X16,    /* Pressure oversampling */
                  Adafruit_BMP280::FILTER_X16,      /* Filtering. */
                  Adafruit_BMP280::STANDBY_MS_500); /* Standby time. */

}

void loop() {

  Serial.print(F("Temperature = "));
  Serial.print(bmp.readTemperature());
  Serial.println(" *C");

  Serial.print(F("Pressure = "));
  Serial.print(bmp.readPressure()/100); //displaying the Pressure in hPa, you can change the unit
  Serial.println(" hPa");

  Serial.print(F("Approx altitude = "));
  Serial.print(bmp.readAltitude(1019.66)); //The "1019.66" is the pressure(hPa) at sea level in day in your region
  Serial.println(" m");                    //If you don't know it, modify it until you get your current altitude

  display.clearDisplay();
  float t = bmp.readTemperature();           //Read temperature in C
  float p = bmp.readPressure()/100;         //Read Pressure in Pa and conversion to hPa
  float a = bmp.readAltitude(1019.66);      //Calculating the Altitude, the "1019.66" is the pressure in (hPa) at sea level at day in your region

  delay(2000);
}
Data is communicated over Wifi to an MQTT messaging server.
On server we require a relay to subscribe for MQTT messages on sensor device channel, establish a WebSocket and write data to connected browser clients.
An implementation in NodeJS requires WS, MQTT and events libraries:
// setup Websocket Server
const WebSocket = require('ws');
var ws_host = "192.168.1.127";
var ws_port = "8080";
const wss = new WebSocket.Server({ host: ws_host, port: ws_port });
var ws = null;

// Setup MQTT Client
// mqtt[s]://[username][:password]@host.domain[:port]
var mqtt = require('mqtt'), url = require('url');
var mqtt_url = url.parse(process.env.MQTT_URL || 'mqtt://192.168.1.127:1883');
var auth = (mqtt_url.auth || ':').split(':');
var url = "mqtt://" + mqtt_url.host;
var mqtt_channel_in = "esp8266.in";
var mqtt_channel_out = "esp8266.out";

var options = {
    port: mqtt_url.port,
    clientId: 'mqttjs_' + Math.random().toString(16).substr(2, 8),
    username: 'mqtt',
    password: '__mqtt_password__',
    keepalive: 60,
    reconnectPeriod: 1000,
    protocolId: 'MQIsdp',
    protocolVersion: 3,
    clean: true,
    encoding: 'utf8'
};
NodeJS is event based, when an MQTT message is received it can be forwarded to all connected WebSocket clients:
mqttClient.on('message', function sendMsg(topic, message, packet) {

  console.log(topic + ": " + message);

  var eventListeners = require('events').EventEmitter.listenerCount(mqttClient,'message');
  console.log(eventListeners + " Listner(s) listening to mqttClient message event");
  console.log(mqttClient.rawListeners('message'));

  wss.clients.forEach(function each(ws) {
    if (ws.isAlive === false) return ws.terminate();
    console.log(data);
    ws.send(data+" ");
  });

});
MQTT allows many subscribers to receive topic messages.
Python Eclipse Paho MQTT client with Mongo DB
A client based on Eclipse Paho ( https://www.eclipse.org/paho/ ) developed in Python might add persistence by writing to a Mongo DB datastore:
### Python MQTT client
### Subscribes to an MQTT topic receiving JSON format messages in format:
###    [{"ts":1586815920,"temp":22.3,"pressure":102583,"alt":76}]
###
### Writes receieved JSON data to a mongo DB collection
###
import paho.mqtt.client as mqtt
import json
import pymongo

mqtt_server = "192.168.1.127"
mqtt_port = 1883
mqtt_keepalive = 60
mqtt_channel_out = "esp8266.out"
mqtt_channel_in = "esp8266.in"

mongo_server = "mongodb://localhost:27017/"
mongo_db = "weather"
mongo_collection = "sensorData"

def on_connect(client,userdata,flags,rc):
    print("Connected with result code:"+str(rc))
    print ("MQTT server: "+mqtt_server+", port: "+str(mqtt_port));
    print ("MQTT topic: "+mqtt_channel_out);
    client.subscribe(mqtt_channel_out)

def on_message(client, userdata, msg):
    print(msg.payload)
    parsed_json = (json.loads(msg.payload))
    res = sensorData.insert_one(parsed_json[0])

mongoClient = pymongo.MongoClient(mongo_server)
mydb = mongoClient[mongo_db]
sensorData = mydb[mongo_collection]

mqttClient = mqtt.Client()
mqttClient.connect(mqtt_server,mqtt_port,mqtt_keepalive);

mqttClient.on_connect = on_connect
mqttClient.on_message = on_message

mqttClient.loop_forever()
Web Browser Client – D3.js WebSocket Real Time Chart
Necessary cookies help make a website usable by enabling basic functions like page navigation and access to secure areas of the website. The website cannot function properly without these cookies.
We do not use cookies of this type.
Marketing cookies are used to track visitors across websites. The intention is to display ads that are relevant and engaging for the individual user and thereby more valuable for publishers and third party advertisers.
We do not use cookies of this type.
Analytics cookies help website owners to understand how visitors interact with websites by collecting and reporting information anonymously.
We do not use cookies of this type.
Preference cookies enable a website to remember information that changes the way the website behaves or looks, like your preferred language or the region that you are in.
We do not use cookies of this type.
Unclassified cookies are cookies that we are in the process of classifying, together with the providers of individual cookies.
We do not use cookies of this type.
Cookies are small text files that can be used by websites to make a user's experience more efficient. The law states that we can store cookies on your device if they are strictly necessary for the operation of this site. For all other types of cookies we need your permission. This site uses different types of cookies. Some cookies are placed by third party services that appear on our pages.