Categories
arduino C/C++ esp8266 Internet of Things Python Software WebSockets

WebSocket Binary – ESP8266 to Web Browser

Binary wire protocols are long established for embedded machine to machine (M2M) communication, network applications and wireless radio data transmission.

Internet of Things (IOT) devices, real time sensors, robotics, smart home of industrial machine control data also demand efficient, low latency & lightweight data communications.

WebSockets ( RFC6455 ) protocol brings native support for binary framed messaging to web browser clients, offering a compact lightweight format for fast and efficient endpoint messaging.

Why use binary format data messaging?

Compared to serialisation of more complex text based wire formats, binary is lightweight and requires minimal storage / bandwidth and processing.

Taking an example key/value command data message:

// JSON encoding
{"cmd":101,"value":180}
23 * 2 = 46 bytes

// CSV plain text encoding
101,180\n
9 * 2 = 18 bytes 

// Binary
101 180
int (4 bytes) + int(4 bytes)
4+4 = 8 bytes

In case of high performance applications supporting a large number of clients or very high frequency of data exchange, minimising data size, bandwidth and processing becomes an important priority.

Binary wire protocols are long established for embedded M2M messaging

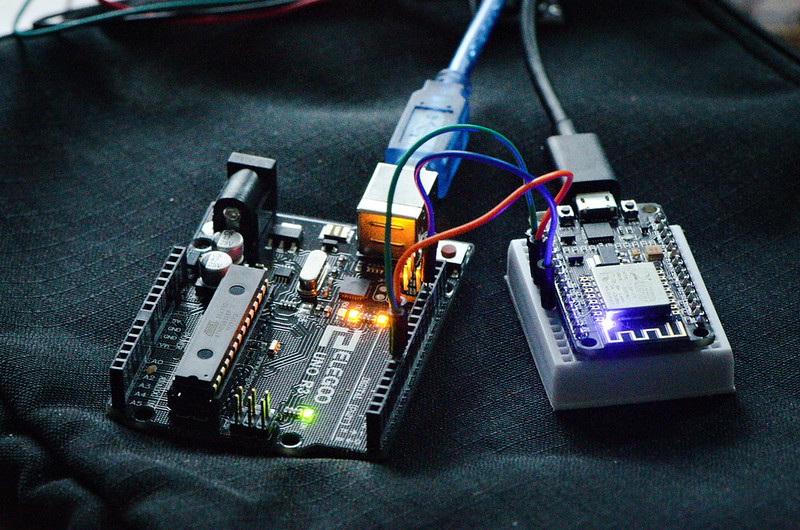
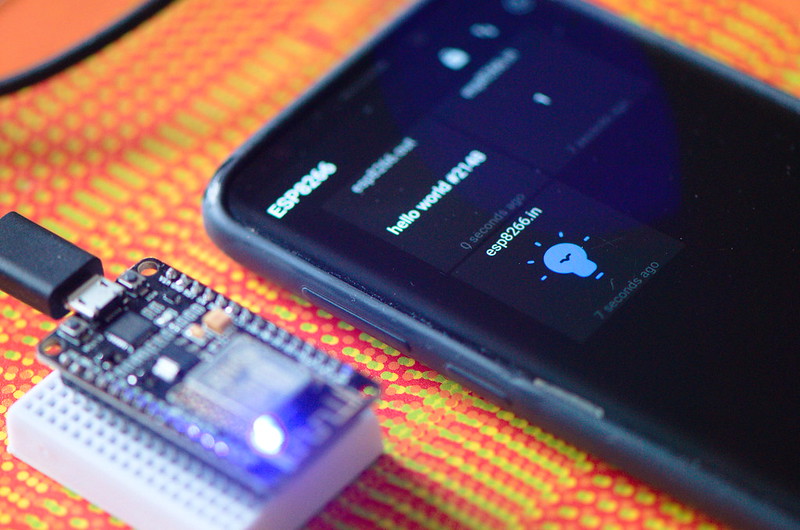
Taking as a simple example an embedded ESP8266 WiFi device, message gateway and web browser client, data serialisation and bidirectional binary framed WebSocket data exchange are demonstrated.

ESP8266 Byte Array Serialisation

Internally data is represented in embedded microcontrollers as ones and zeros, sequences of bits arranged in addressable memory.

Higher level programming language abstraction provides human readable textual labels and in case of C/C++ associated type information.

Lets define a mixed type data structure that could be some kind of sensor or message data payload –

    // define mixed type data struct
    struct Data
    {
        int id;
        float v1;
        float v2;
        unsigned long v3;
        char v4[20];
    };

    struct Data data;

    // populate data values
    data.id = 67;
    data.v1 = 3.14157;
    data.v2 = -7.123;

    unsigned long ts = millis();
    data.v3 = ts;

    char c[20] = "N NE E SE S SW W NW";
    strncpy(data.v4, c, 20);

To access underlying bytes, a pointer to data structure address is created –

    uint8_t * bytePtr = (uint8_t*) &data;    
    webSocket.sendBIN(bytePtr, sizeof(data));

Data pointer and length are passed to WebSocket send method “webSocket.sendBIN()”, byte range is read, packaged (framed) according to protocol specification and written to TCP/IP network socket.

Hexidecimal and Binary text representation of in memory data structure can also be displayed –

void printBytes(const void *object, size_t size)
{
    const uint8_t * byte;
    for ( byte = (uint8_t *) object; size--; ++byte )
    {
        Serial.print(*byte, HEX);
        Serial.print("\t");
        Serial.println(*byte, BIN);
    }
    Serial.println('\n');
}

Python WebSocket Server

A Python3 middleware hosts WebSocket server and acts as a message relay gateway.

Binary WebSocket messages can be decoded in Python, the struct module performs conversions between Python data types and C structs –

async def wsApi(websocket, path):
    try:
        async for message in websocket:
            print('User-Agent: '+ websocket.request_headers['User-Agent'])
            print('Sec-WebSocket-Key: '+websocket.request_headers['Sec-WebSocket-Key'])
            print('MessageType: '+str(type(message)))
            print(message);
            print('Hex: '+message.hex());

            if isinstance(message, (bytes, bytearray)):

                i = message[:4];
                print(i);
                tuple_of_data = struct.unpack("i", i)
                print(tuple_of_data)

                tuple_of_data = struct.unpack_from("f", message, 4)
                print(tuple_of_data)

                tuple_of_data = struct.unpack_from("f", message, 8)
                print(tuple_of_data)

                tuple_of_data = struct.unpack_from("i", message, 12)
                print(tuple_of_data)

                tuple_of_data = struct.unpack_from("20s", message, 16)
                print(tuple_of_data[0])

                ## forward message
                await asyncio.wait([user.send(message) for user in USERS])

To index into byte array and read a number of bytes according to data type being unpacked Python’s array slice method “i = message[:4]” can be used where [<from>:<to>] specifies start/end positions.

Method struct.unpack_from() is another approach, taking as parameters a format character specifying data type (“i” – integer, “f” – float), data buffer and an index (in bytes) to read from.

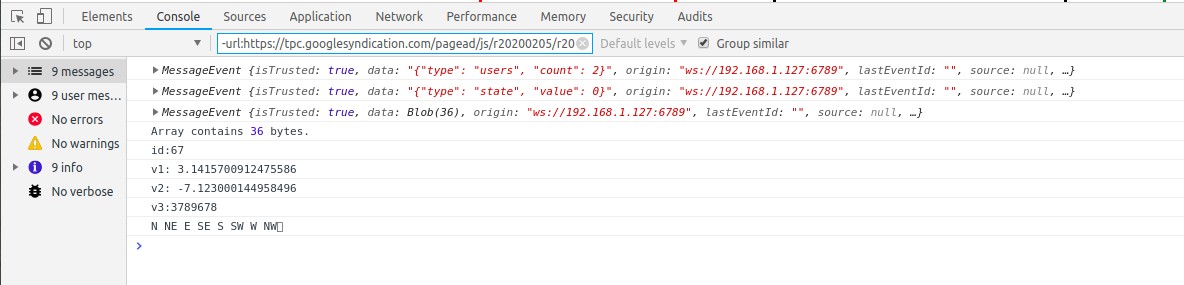
Here is decoded binary message output including some WebSocket headers –

User-Agent: arduino-WebSocket-Client
Sec-WebSocket-Key: zoJ0aR/5XunSvEKKcUkWfQ==
MessageType: <class 'bytes'>
b'C\x00\x00\x00|\x0fI@\x9e\xef\xe3\xc0\xb9\x17\x00\x00N NE E SE S SW W NW\x00'
Hex: 430000007c0f49409eefe3c0b91700004e204e45204520534520532053572057204e5700
b'C\x00\x00\x00'
(67,)
(3.1415700912475586,)
(-7.123000144958496,)
(6073,)
b'N NE E SE S SW W NW\x00'

Web Browser – Binary Encode/Decode in JavaScript

In web browser, JavaScript primitives Blob, ArrayBuffer and TypedArray perform a similar conversion.

Firstly, received WebSocket messages (event object) can be debugged to console –

 websocket.onmessage = function (event) {
    console.log(event);

Binary framed data payload is reported as type “Blob” (raw data) of length 36 bytes –

Chrome Developer Tools console log for WebSocket Binary message receieve event

To de-serialise message, raw data Blob is converted asynchronously using FileReader API to ArrayBuffer, a generic fixed length binary data buffer –

    if (event.data instanceof Blob)  // Binary Frame
    {
      // convert Blob to ArrayBuffer
      var arrayPromise = new Promise(function(resolve) {
          var reader = new FileReader();

          reader.onloadend = function() {
              resolve(reader.result);
          };

          reader.readAsArrayBuffer(event.data);
      });

When promise is fulfilled, ArrayBuffer can be read using typed views (Uint32Array, Uint32Array) for integer (including long) and float types, TextDecoder API is used to decode character array –

arrayPromise.then(function(buffer) {

          // Decoding Binary Packed Data

          // int (4 bytes)
          var arrInt = new Uint32Array(buffer);
          var id = arrInt[0];
          console.log("id:"+id);

          // 2x float (4 bytes)
          var arrFloat = new Uint32Array(buffer,4);
          var v1 = arrFloat[0];
          var v2 = arrFloat[1];
          console.log("v1: "+v1);
          console.log("v2: "+v2);

          // long (4 bytes)
          var v3 = arrInt[3];
          console.log("v3:"+v3);

          // character data (20 bytes)
          var uint8Array = new Uint8Array(buffer,16);
          var string = new TextDecoder("utf-8").decode(uint8Array);
          console.log(string);
      });

JavaScript Binary Data Encoding

Binary data can also be encoded from native JavaScript. TypedArrays created for each data type – integer, float, long and character array are populated and packed into an ArrayBuffer suitable for use as WebSocket data payload –

console.log("Binary Encode example");

// Binary Encode example
var buffer = new ArrayBuffer(36)
var arrInt =   new Uint32Array(buffer, 0, 1);
arrInt[0] = 67;
var arrFloat = new Float32Array(buffer, 4, 2);
arrFloat[0] = 3.14157;
arrFloat[1] = -7.123;

var arrInt2 =   new Uint32Array(buffer, 12, 1);
arrInt2[0] = Date.now();

var uint8Array = new Uint8Array(buffer,16);
var charBuffer = new TextEncoder("utf-8").encode("N NE E SE S SW W NW");

for(var i = 0; i<charBuffer.length; i++)
{
  uint8Array[i] = charBuffer[i];
}

// send binary data
websocket.send(buffer);

At message gateway, logs demonstrate parity between data packed by embedded device and those sent from web browser client –

User-Agent: Mozilla/5.0 (X11; Linux x86_64) AppleWebKit/537.36 (KHTML, like Gecko) Chrome/69.0.3497.100 Safari/537.36
Sec-WebSocket-Key: 1TD9Zp71cMTivUbj+QSx5w==
MessageType: <class 'bytes'>
b'C\x00\x00\x00|\x0fI@\x9e\xef\xe3\xc0\x07\x1c\xff\x91N NE E SE S SW W NW\x00'
Hex: 430000007c0f49409eefe3c0071cff914e204e45204520534520532053572057204e5700
b'C\x00\x00\x00'
(67,)
(3.1415700912475586,)
(-7.123000144958496,)
(-1845552121,)
b'N NE E SE S SW W NW\x00'

Limitations / Drawbacks

Compared to UTF-8 text formats (XML, JSON) packed binary data has significant disadvantages –

  • legibility – text based key/value formats are easy to read, manipulate and maintain
  • fixed frame boundaries – using positional byte sequence indexes means even small changes to message structure, size or field position require updates to consumer client code
  • endianess / alignment / padding must be maintained consistently, compiler and platform implementation differences may occur

Security

WebSockets Secure (WSS) offers transport layer security (TLS) to encrypt data streams. An authentication and authorisation strategy (challenge/response password, token or certificate based) for client identification should also be deployed. Cryptographic message digest signing or encryption might also be used as extra protection for critical data.

Categories
Internet of Things

MQTT – Internet of Things Messaging with Mosquitto

MQTT (Message Queue Telemetry Transport) is a messaging wire communications protocol for machine to machine (M2M) and software component integration.

Use cases:

  • Sensors / IOT devices
  • Robotics, Industrial Monitoring & Remote Control
  • Automation – Smart Home
  • Mobile, Web Browser UI clients, Cloud Services
  • Integration – local & long range communication between software & services

In contrast to world wide web, where browsers pull web pages from internet servers (request/response), MQTT implements a Publish / Subscribe (PubSub) and a push messaging model.

Common with HTTP at transport OSI network layer MQTT extends TCP/IP.

MQTT clients connect and transmit to brokers (servers), who register subscribers to named topics (channels).

A WiFi enabled ESP8266 device and Mobile (Android) interface

Message data payload can contain arbitrary binary or UTF-8 Unicode encoded text data (up to 256 MB per message).

Internet of Things (IOT) devices deploy MQTT as a lightweight email (SMTP) like solution for data exchange suitable for integrating software, sensors, devices and cloud services.

An OASIS standard currently at version 5x ( http://mqtt.org/ ) defines capabilities including:

  • Distributed, bi-directional message flows
  • Quality of Service (QOS) delivery levels: at least once, only once, guaranteed message order
  • Security: Authentication, Encryption – TLS, OpenSSL, OAuth
  • Low power consumption / bandwidth
  • Push-store-forward including to offline clients
  • Browser client integration with WebSockets (RFC 6455)

Lets take a closer look at Mosquitto ( https://mosquitto.org/ ) an open source MQTT broker implementation sponsored by Apache Software Foundation .

Mosquitto MQTT Setup under Linux Ubuntu

Mosquitto can be installed on Ubuntu with package manager:

sudo apt-get install mosquitto mosquitto-clients -y  

From a binary package ( https://mosquitto.org/files/source/ ) or compiled from source:

Download source:

mkdir mqtt
cd mqtt
git clone https://github.com/eclipse/mosquitto

Install Dependencies:

sudo apt-get install git cmake libc-ares-dev uuid-dev libssl-dev zlib1g-dev xsltproc docbook-xsl
RFC6455 WebSockets
sudo apt-get install libwebsockets-dev
Unit Test Framework
sudo apt-get install libcunit1 libcunit1-doc libcunit1-dev

Edit build config (eg add websockets)

vi config.mk

Build / Install

make clean
make test
make
make install

Mosquitto File Paths / Commands:

Config File
/etc/mosquitto/conf.d/default.conf

Logs
/var/log/mosquitto/mosquitto.log

Start/stop/restart

sudo /etc/init.d/mosquitto restart
[ ok ] Restarting mosquitto (via systemctl): mosquitto.service.
1594324669: Config loaded from /etc/mosquitto/mosquitto.conf.
1594324669: Opening ipv6 listen socket on port 1883.
1594324669: Opening ipv4 listen socket on port 1883.
1594324669: Opening ipv4 listen socket on port 8883.
1594331039: mosquitto version 1.6.10 starting

Mosquitto Password Authentication

Mosquitto user/password authentication can be required on a per listener basis.

Add broker authentication per listener in default.conf

listener 1883 localhost
allow_anonymous false
password_file /etc/mosquitto/passwd

Generate per user password credential –

sudo mosquitto_passwd -c /etc/mosquitto/passwd <user>

To prevent disclosure of password in shell command history an environment variable can be set in user profile –

MOSQUITTO_PASSWORD=<password>

Command line connect string references environment password variable

mosquitto_pub -h localhost -t test.out -m "test message #3" -u mqtt -P $MOSQUITTO_PASSWORD

Mosquitto SSL setup

Mosquitto man page has information on SSL and TLS setup.

Firewall port 8883 is opened (production deployment should restrict connection to known clients)

sudo ufw allow from any to any port 8883 proto tcp

To use self signed SSL certificates we create a Certificate Authority (CA) key –

sudo openssl req -new -x509 -days 360 -extensions v3_ca -keyout ca.key -out ca.crt

Next we generate and sign certificate for MQTT server, noting that key encryption is not supported –

sudo openssl genrsa -out server.key 2048
sudo openssl req -out server.csr -key server.key -new
sudo openssl x509 -req -in server.csr -CA ca.crt -CAkey ca.key -CAcreateserial -out server.crt -days 360

Finally we create a certificate for MQTT client –

sudo openssl genrsa -des3 -out client.key 2048
sudo openssl req -out client.csr -key client.key -new
sudo openssl x509 -req -in client.csr -CA ca.crt -CAkey ca.key -CAcreateserial -out  client.crt -days 360

Key Points –

  • Server key must not use key encryption or Mosquitto raises error:
	1594334396: Error: Unable to load server key file "/etc/mosquitto/certs/server.key". Check keyfile.
	1594334396: OpenSSL Error[0]: error:2807106B:UI routines:UI_process:processing error
	1594334396: OpenSSL Error[1]: error:0906406D:PEM routines:PEM_def_callback:problems getting password
	1594334396: OpenSSL Error[2]: error:0906A068:PEM routines:PEM_do_header:bad password read
	1594334396: OpenSSL Error[3]: error:140B0009:SSL routines:SSL_CTX_use_PrivateKey_file:PEM lib

  • Common Name (CN) must be different across each of CA, Server and Client certs for example –

Common Name (e.g. server FQDN or YOUR name) []:
CA: selfcert.local
Server: mqtt.steveio.com
Client: ESP32

Otherwise following errors occur –

Server:
1594327583: OpenSSL Error: error:14094418:SSL routines:ssl3_read_bytes:tlsv1 alert unknown ca

Client:
stevee@ideapad-530S:~/ssl_cert$ sudo mosquitto_pub --insecure --cafile /etc/mosquitto/ca_certificates/ca.crt --cert /etc/mosquitto/certs/client.crt --key /etc/mosquitto/certs/client.key -h mqtt.steveio.com -p 8883 -q 1 -t "test" -i anyclientID --tls-version tlsv1.3 -m "Hello" -d
Enter PEM pass phrase:
Client anyclientID sending CONNECT
OpenSSL Error[0]: error:1416F086:SSL routines:tls_process_server_certificate:certificate verify failed
Error: A TLS error occurred.

Mosquitto Broker SSL Configuration

Mosquitto Broker SSL default.conf Listener Configuration

listener 8883 mqtt.steveio.com
cafile /etc/mosquitto/ca_certificates/ca.crt
keyfile /etc/mosquitto/certs/server.key
certfile /etc/mosquitto/certs/server.crt

Restart Mosquitto service and check logs

sudo service mosquitto restart
sudo cat /var/log/mosquitto/mosquitto.lo

1596376328: mosquitto version 1.6.10 starting
1596376328: Config loaded from /etc/mosquitto/mosquitto.conf.
1596376328: Opening ipv6 listen socket on port 1883.
1596376328: Opening ipv4 listen socket on port 1883.
1596376328: Opening ipv4 listen socket on port 8883.

Testing SSL connection with openSSL client

# use openssl client to test connection
sudo openssl s_client -connect mqtt.steveio.com:8883 -CAfile /etc/mosquitto/ca_certificates/ca.crt

SSL Publish using Mosquitto broker command line

sudo mosquitto_pub --cafile /etc/mosquitto/ca_certificates/ca.crt --cert /etc/mosquitto/certs/client.crt --key /etc/mosquitto/certs/client.key -h mqtt.steveio.com -p 8883 -q 1 -t "test" -i anyclientID --tls-version tlsv1.3 -m "Hello" -d -u mqtt -P $MOSQUITTO_PASSWORD 

Enter PEM pass phrase:
Client anyclientID sending CONNECT
Client anyclientID received CONNACK (0)
Client anyclientID sending PUBLISH (d0, q1, r0, m1, 'test', ... (5 bytes))
Client anyclientID received PUBACK (Mid: 1, RC:0)
Client anyclientID sending DISCONNECT

SSL Subscribe using Mosquitto broker

sudo mosquitto_sub --cafile /etc/mosquitto/ca_certificates/ca.crt --cert /etc/mosquitto/certs/client.crt --key /etc/mosquitto/certs/client.key -h mqtt.steveio.com -p 8883 -q 1 -t "test" -i anyclientID --tls-version tlsv1.3 -d -u mqtt -P $MOSQUITTO_PASSWORD

MQTT Offline Clients – Store / Persist / Forward

A feature within MQTT specification is store / forward, enabling message delivery to offline or clients connecting only on a scheduled basis. Normally, messages are delivered immediately to all topic subscribers. When clients setup a persistent session, messages with QOS level 1 or 2 are queued for delivery in the event they are offline.

Requirements:

  • QoS level: 1 / 2
  • Fixed client ID
  • Always connect with clean_session=False
  • Subscriptions must be made with QoS>0
  • Messages published must have QoS>0

Example Store / Forward Message Flow

Subscriber specifies qos level 1, client identity (-i), clean flag (-c)

mosquitto_sub -h localhost -t test.out -u mqtt -P $MOSQUITTO_PASSWORD -q 1 -c -i broker

Client -c5646 sending CONNECT
Client -c5646 received CONNACK
Client -c5646 sending SUBSCRIBE (Mid: 1, Topic: test.out, QoS: 1)
Client -c5646 received SUBACK
Subscribed (mid: 1): 1

Publisher sends msg #1 to online client

mosquitto_pub -h localhost -t test.out -m "test message #1" -u mqtt -P $MOSQUITTO_PASSWORD -d -q 1 -i client

Client -c8212 sending CONNECT
Client -c8212 received CONNACK
Client -c8212 sending PUBLISH (d0, q1, r0, m1, 'test.out', ... (15 bytes))
Client -c8212 received PUBACK (Mid: 1)
Client -c8212 sending DISCONNECT

Subscriber (online) receives message #1

Client -c8186 received PUBLISH (d0, q1, r0, m1, 'test.out', ... (15 bytes))
Client -c8186 sending PUBACK (Mid: 1)
test message #1

Subscriber disconnects, publisher sends message #2

mosquitto_pub -h localhost -t test.out -m "test message #2" -u mqtt -P $MOSQUITTO_PASSWORD -d -q 1 -i client

Subscriber connects, receiving message sent during offline

mosquitto_sub -h localhost -t test.out -u mqtt -P $MOSQUITTO_PASSWORD -d -q 1 -c -i broker

Client broker sending CONNECT
Client broker received CONNACK
Client broker sending SUBSCRIBE (Mid: 1, Topic: test.out, QoS: 1)
Client broker received PUBLISH (d0, q1, r0, m2, 'test.out', ... (15 bytes))
Client broker sending PUBACK (Mid: 2)
test message #2
Client broker received SUBACK
Subscribed (mid: 1): 1

There is a more detailed examination of persistence and store / forward here.

As MQTT matures it would be useful to see tools like Postfix qshape emerge for bottleneck and message queue administration.