Categories
arduino Coding Internet of Things nodejs Python Software

MQTT to Websockets with ESP32, NodeJS and D3.js

MQTT is a lightweight messaging protocol suitable for embedded and IOT devices.

Websockets ( RFC6455 – https://tools.ietf.org/html/rfc6455 ) is socket programming for internet, an evolution of browser / web server HTTP enabling real-time bidirectional data exchange and binary messaging.

How do we interface a MQTT enabled IOT sensor device with a web browser interface displaying a real time graph chart?

A real time web based barometric air pressure chart interface created with WebSockets and D3.js

Introduction to WebSockets – Real Time TCP Sockets for Internet

With modern browser engines and responsive web UI technologies built on HTML5, SVG and JavaScript frameworks, sophisticated visualisation, display and dashboard reporting capabilities have emerged.

Responsive Web UI runs in any browser installed device – laptop, dekstop, tablet or mobile, without need to install additional software or prepare application code for specific device architectures.

HTTP browser clients essentially implement a polling request/response technique for retrieving and updating HTML format webpages.

Due to need to establish a connection for each new request, HTTP is not well suited to real time or high volume messaging, charting or visualisation applications.

Although AJAX (asynchronous JavaScipt XML) and REST, SOAP API programming overcome this to a certain extent these methods are relatively inefficient for some use cases due to protocol overhead.

With Websockets, TCP network socket programming becomes possible in a browser client application.

Clients can establish a network socket connection, this channel remains open and two-way data exchange including binary messaging formats takes place.

Sockets are well established in UNIX and Windows OS client/server programming, but are relatively new to the web.

Arduino ESP32 Barometer Sensor MQTT Device

An ESP32 microcontroller with BMP280 environmental sensor and OLED LCD display

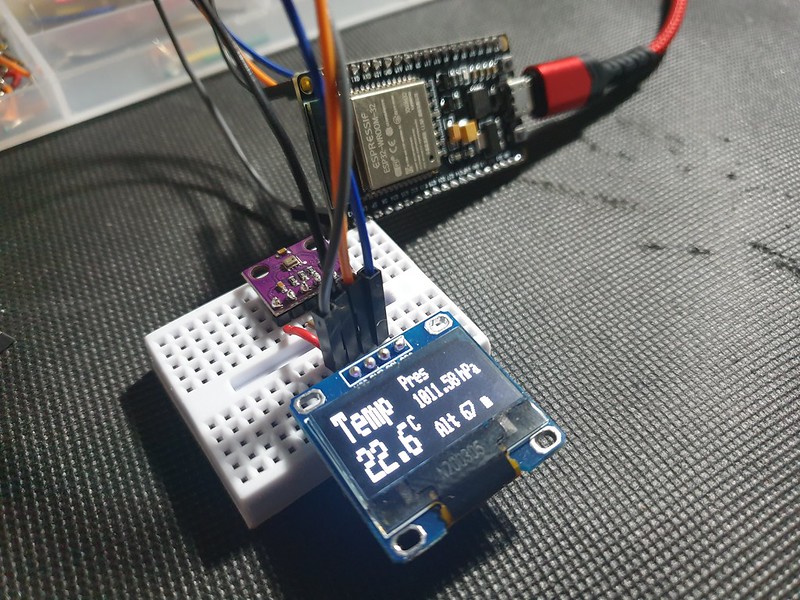
An environmental sensor based on an Expressif ESP32 micro-controller and BMP280 Bosch sensor reads air pressure, temperature and altitude –

#include <Adafruit_BMP280.h>

Adafruit_BMP280 bmp;

void setup() {

  if (!bmp.begin()) {
    Serial.println(F("Could not find a valid BMP280 sensor, check wiring!"));
    while (1);
  }
  
  /* Default settings from datasheet. */
  bmp.setSampling(Adafruit_BMP280::MODE_NORMAL,     /* Operating Mode. */
                  Adafruit_BMP280::SAMPLING_X2,     /* Temp. oversampling */
                  Adafruit_BMP280::SAMPLING_X16,    /* Pressure oversampling */
                  Adafruit_BMP280::FILTER_X16,      /* Filtering. */
                  Adafruit_BMP280::STANDBY_MS_500); /* Standby time. */  

}

void loop() {

  Serial.print(F("Temperature = "));
  Serial.print(bmp.readTemperature());
  Serial.println(" *C");

  Serial.print(F("Pressure = "));
  Serial.print(bmp.readPressure()/100); //displaying the Pressure in hPa, you can change the unit
  Serial.println(" hPa");

  Serial.print(F("Approx altitude = "));
  Serial.print(bmp.readAltitude(1019.66)); //The "1019.66" is the pressure(hPa) at sea level in day in your region
  Serial.println(" m");                    //If you don't know it, modify it until you get your current altitude

  display.clearDisplay();
  float t = bmp.readTemperature();           //Read temperature in C
  float p = bmp.readPressure()/100;         //Read Pressure in Pa and conversion to hPa
  float a = bmp.readAltitude(1019.66);      //Calculating the Altitude, the "1019.66" is the pressure in (hPa) at sea level at day in your region

  delay(2000);
}

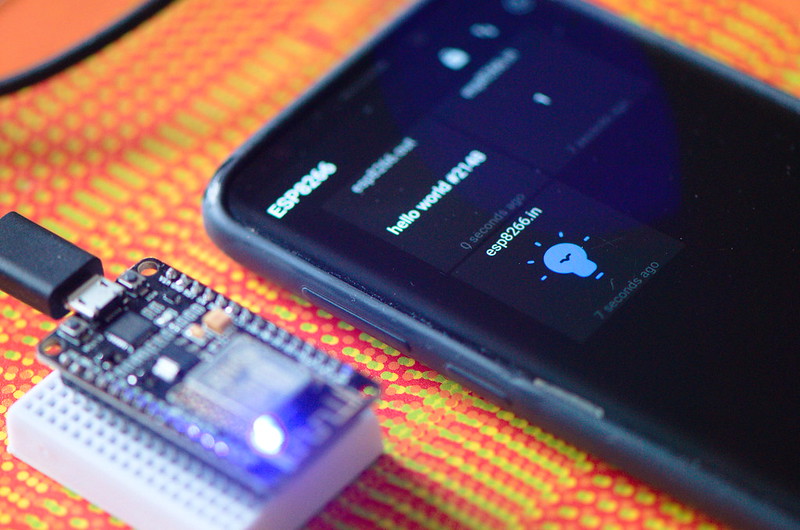
Data is communicated over Wifi to an MQTT messaging server.

On Arduino we can use PubSub MQTT Library ( https://github.com/knolleary/pubsubclient ).

To set this up, first we define Wifi and MQTT server credentials and topic id (channels) and define a transmit data buffer:

const char* ssid = "__SSID__";
const char* pass = "__PASS__";

IPAddress mqtt_server(192, 168, 1, 127); // local LAN Address
const char* mqtt_user = "mqtt";
const char* mqtt_password = "__mqttpassword__";

const char* mqtt_channel_pub = "esp32.out";
const char* mqtt_channel_sub = "esp32.in";

WiFiClient wifi;
PubSubClient mqtt(wifi);

#define MSG_BUFFER_SIZE (128)
char msg[MSG_BUFFER_SIZE];

Then we setup Wifi connection:

  WiFi.begin(ssid, password);

  while (WiFi.status() != WL_CONNECTED) {
    delay(500);
    Serial.print(".");
  }

  Serial.println("");
  Serial.println("WiFi connected");
  Serial.print("Connecting to ");
  Serial.println(ssid);
  Serial.println("IP address: ");
  Serial.println(WiFi.localIP());

And attempt to connect to MQTT broker, sending a hello message:

void loop() {
  
  while (!mqtt.connected()) {
    Serial.print("Attempting MQTT connection...");
    // Create a random client ID
    String clientId = "ESP8266Client-";
    clientId += String(random(0xffff), HEX);
    // Attempt to connect
    if (mqtt.connect(clientId.c_str(), mqtt_user, mqtt_password)) {
      Serial.println("connected");
      // Once connected, publish an announcement...
      mqtt.publish(mqtt_channel_pub, "hello ESP32");
      // ... and resubscribe
      mqtt.subscribe(mqtt_channel_sub);
    } else {
      Serial.print("failed, rc=");
      Serial.print(mqtt.state());
      Serial.println(" try again in 5 seconds");
      // Wait 5 seconds before retrying
      delay(5000);
    }
  }

  mqtt.loop();
}

After reading, we can transmit sensor values (Temperature T, Pressure P, Altitude A) on ESP32:

  snprintf(msg, MSG_BUFFER_SIZE, "%.2f,%.2f,%.2f", t, p, a);

  Serial.print("Publish message: ");
  Serial.println(msg);
  mqtt.publish(mqtt_channel_pub, msg);

MQTT to WebSocket RFC6455 – Node.JS Relay

On server we require a relay to subscribe for MQTT messages on sensor device channel, establish a WebSocket and write data to connected browser clients.

An implementation in NodeJS requires WS, MQTT and events libraries:

// setup Websocket Server
const WebSocket = require('ws');
var ws_host = "192.168.1.127";
var ws_port = "8080";
const wss = new WebSocket.Server({ host: ws_host, port: ws_port });
var ws = null;

// Setup MQTT Client
// mqtt[s]://[username][:password]@host.domain[:port]
var mqtt = require('mqtt'), url = require('url');
var mqtt_url = url.parse(process.env.MQTT_URL || 'mqtt://192.168.1.127:1883');
var auth = (mqtt_url.auth || ':').split(':');
var url = "mqtt://" + mqtt_url.host;
var mqtt_channel_in = "esp8266.in";
var mqtt_channel_out = "esp8266.out";

var options = {
    port: mqtt_url.port,
    clientId: 'mqttjs_' + Math.random().toString(16).substr(2, 8),
    username: 'mqtt',
    password: '__mqtt_password__',
    keepalive: 60,
    reconnectPeriod: 1000,
    protocolId: 'MQIsdp',
    protocolVersion: 3,
    clean: true,
    encoding: 'utf8'
};

NodeJS is event based, when an MQTT message is received it can be forwarded to all connected WebSocket clients:

mqttClient.on('message', function sendMsg(topic, message, packet) {

  console.log(topic + ": " + message);

  var eventListeners = require('events').EventEmitter.listenerCount(mqttClient,'message');
  console.log(eventListeners + " Listner(s) listening to mqttClient message event");
  console.log(mqttClient.rawListeners('message'));

  wss.clients.forEach(function each(ws) {
    if (ws.isAlive === false) return ws.terminate();
    console.log(data);
    ws.send(data+" ");
  });

});

MQTT allows many subscribers to receive topic messages.

Python Eclipse Paho MQTT client with Mongo DB

A client based on Eclipse Paho ( https://www.eclipse.org/paho/ ) developed in Python might add persistence by writing to a Mongo DB datastore:

### Python MQTT client
### Subscribes to an MQTT topic receiving JSON format messages in format:
###    [{"ts":1586815920,"temp":22.3,"pressure":102583,"alt":76}]
###
### Writes receieved JSON data to a mongo DB collection
###
import paho.mqtt.client as mqtt
import json
import pymongo

mqtt_server = "192.168.1.127"
mqtt_port = 1883
mqtt_keepalive = 60
mqtt_channel_out = "esp8266.out"
mqtt_channel_in = "esp8266.in"

mongo_server = "mongodb://localhost:27017/"
mongo_db = "weather"
mongo_collection = "sensorData"

def on_connect(client,userdata,flags,rc):
    print("Connected with result code:"+str(rc))
    print ("MQTT server: "+mqtt_server+", port: "+str(mqtt_port));
    print ("MQTT topic: "+mqtt_channel_out);
    client.subscribe(mqtt_channel_out)

def on_message(client, userdata, msg):
    print(msg.payload)
    parsed_json = (json.loads(msg.payload))
    res = sensorData.insert_one(parsed_json[0])

mongoClient = pymongo.MongoClient(mongo_server)
mydb = mongoClient[mongo_db]
sensorData = mydb[mongo_collection]

mqttClient = mqtt.Client()
mqttClient.connect(mqtt_server,mqtt_port,mqtt_keepalive);

mqttClient.on_connect = on_connect
mqttClient.on_message = on_message

mqttClient.loop_forever()

Web Browser Client – D3.js WebSocket Real Time Chart

WebSockets are supported natively in JavaScript by modern browser clients.

Setting up a WebSocket client, we consider re-connect attempts and parse received message data (JSON format in this example):

      <script type="text/javascript">

        var dataArr = [];

        var ws = null
        var maxReconnectAttemps = 10;
        var reconnectAttempts = 0;

        // setup WebSocket
        function setupWebSocket()
        {

          reconnectAttempts = 0;

          ws = new WebSocket('ws://192.168.1.127:8080',[]);

          ws.onopen = function () {
            console.log('WebSocket Open');
          };

          ws.onerror = function (error) {
            console.log('WebSocket Error ' + error);
          };

          ws.onmessage = function (e) {
            var rawData = e.data;
            if(rawData.trim().length > 1 &amp;&amp; rawData.trim() != "undefined")
            {
              try {

                var jsonObj = JSON.parse(rawData);
                jsonObj[0]['t'] = jsonObj[0]['t']; // temperature
                jsonObj[0]['p'] = jsonObj[0]['pressure']; // air pressure
                jsonObj[0]['a'] = jsonObj[0]['alt']; // altitude

                dataArr.push(jsonObj);

              } catch(e) {
                  console.log("Invalid JSON:"+rawData.toString());
              }
            }
          };
        }

        // check connection status every 60sec, upto maxReconnectAttemps, try reconnect
        const interval = setInterval(function checkConnectStatus() {
          if (reconnectAttempts++ < maxReconnectAttemps)
          {
            if (ws.readyState !== ws.OPEN) {
               console.log("WS connection closed - try re-connect");
               setupWebSocket();
            }
          }
        }, 60000);

        document.addEventListener("DOMContentLoaded", function() {
            setupWebSocket();
        });

Finally D3.js ( https://d3js.org/ ) is used to render chart as HTML5 / SVG.

D3.js real time barometer chart with WebSocket data provisioning

Source code and documentation can be found here:
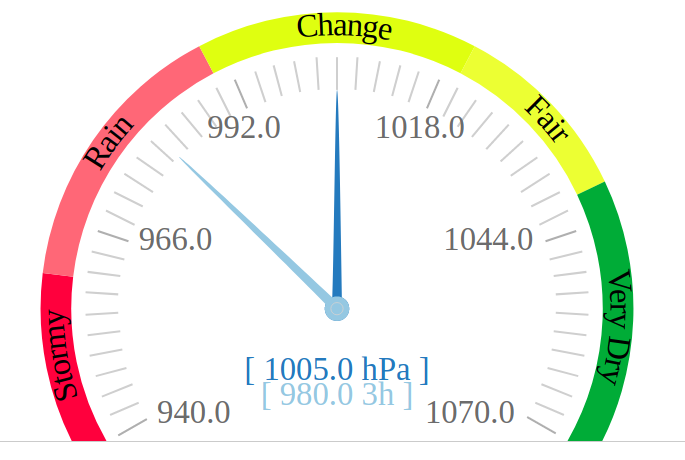
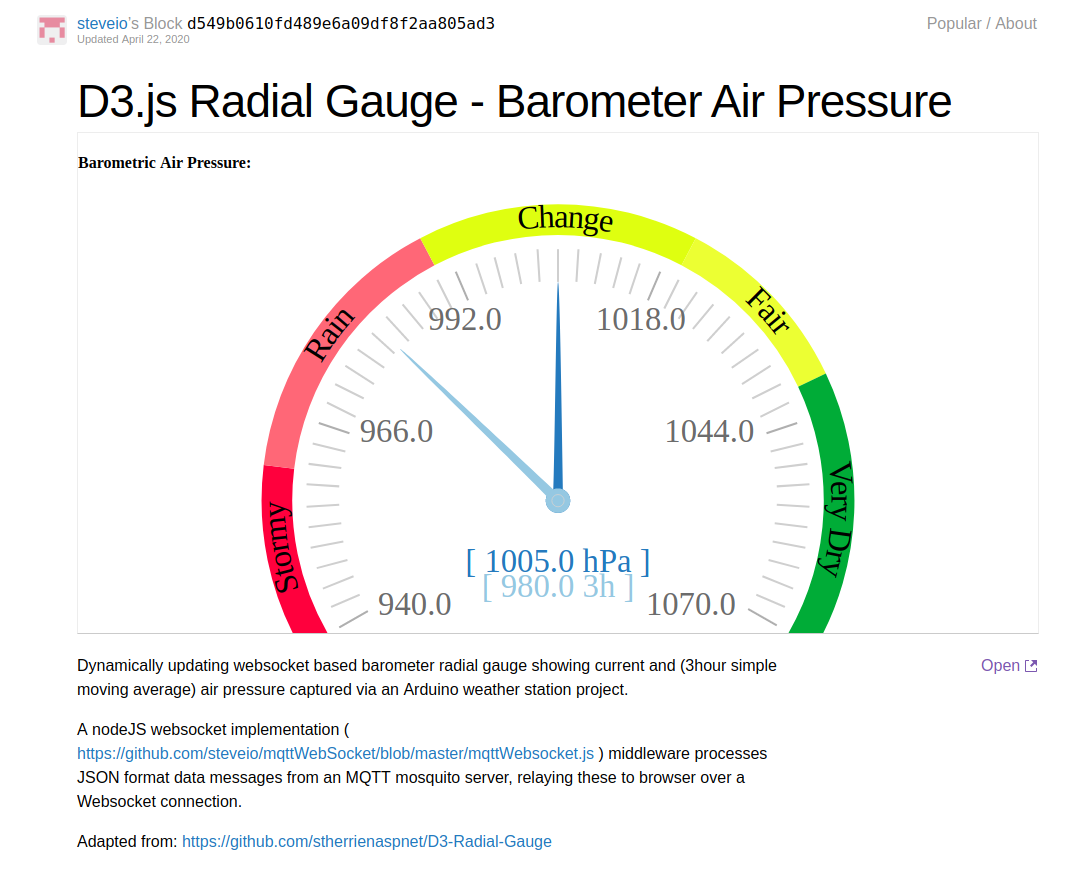
Barometer D3.js:
http://bl.ocks.org/steveio/d549b0610fd489e6a09df8f2aa805ad3
https://gist.github.com/steveio/d549b0610fd489e6a09df8f2aa805ad3

ESP32 wifi Arduino MQTT sensor Client:
https://github.com/steveio/arduino/blob/master/ESP32SensorOLEDWifiMQTT/ESP32SensorOLEDWifiMQTT.ino

MQTT to WebSocket NodeJS relay:
https://github.com/steveio/mqttWebSocket

Categories
Internet of Things

MQTT – Internet of Things Messaging with Mosquitto

MQTT (Message Queue Telemetry Transport) is a messaging wire communications protocol for machine to machine (M2M) and software component integration.

Use cases:

  • Sensors / IOT devices
  • Robotics, Industrial Monitoring & Remote Control
  • Automation – Smart Home
  • Mobile, Web Browser UI clients, Cloud Services
  • Integration – local & long range communication between software & services

In contrast to world wide web, where browsers pull web pages from internet servers (request/response), MQTT implements a Publish / Subscribe (PubSub) and a push messaging model.

Common with HTTP at transport OSI network layer MQTT extends TCP/IP.

MQTT clients connect and transmit to brokers (servers), who register subscribers to named topics (channels).

A WiFi enabled ESP8266 device and Mobile (Android) interface

Message data payload can contain arbitrary binary or UTF-8 Unicode encoded text data (up to 256 MB per message).

Internet of Things (IOT) devices deploy MQTT as a lightweight email (SMTP) like solution for data exchange suitable for integrating software, sensors, devices and cloud services.

An OASIS standard currently at version 5x ( http://mqtt.org/ ) defines capabilities including:

  • Distributed, bi-directional message flows
  • Quality of Service (QOS) delivery levels: at least once, only once, guaranteed message order
  • Security: Authentication, Encryption – TLS, OpenSSL, OAuth
  • Low power consumption / bandwidth
  • Push-store-forward including to offline clients
  • Browser client integration with WebSockets (RFC 6455)

Lets take a closer look at Mosquitto ( https://mosquitto.org/ ) an open source MQTT broker implementation sponsored by Apache Software Foundation .

Mosquitto MQTT Setup under Linux Ubuntu

Mosquitto can be installed on Ubuntu with package manager:

sudo apt-get install mosquitto mosquitto-clients -y  

From a binary package ( https://mosquitto.org/files/source/ ) or compiled from source:

Download source:

mkdir mqtt
cd mqtt
git clone https://github.com/eclipse/mosquitto

Install Dependencies:

sudo apt-get install git cmake libc-ares-dev uuid-dev libssl-dev zlib1g-dev xsltproc docbook-xsl
RFC6455 WebSockets
sudo apt-get install libwebsockets-dev
Unit Test Framework
sudo apt-get install libcunit1 libcunit1-doc libcunit1-dev

Edit build config (eg add websockets)

vi config.mk

Build / Install

make clean
make test
make
make install

Mosquitto File Paths / Commands:

Config File
/etc/mosquitto/conf.d/default.conf

Logs
/var/log/mosquitto/mosquitto.log

Start/stop/restart

sudo /etc/init.d/mosquitto restart
[ ok ] Restarting mosquitto (via systemctl): mosquitto.service.
1594324669: Config loaded from /etc/mosquitto/mosquitto.conf.
1594324669: Opening ipv6 listen socket on port 1883.
1594324669: Opening ipv4 listen socket on port 1883.
1594324669: Opening ipv4 listen socket on port 8883.
1594331039: mosquitto version 1.6.10 starting

Mosquitto Password Authentication

Mosquitto user/password authentication can be required on a per listener basis.

Add broker authentication per listener in default.conf

listener 1883 localhost
allow_anonymous false
password_file /etc/mosquitto/passwd

Generate per user password credential –

sudo mosquitto_passwd -c /etc/mosquitto/passwd <user>

To prevent disclosure of password in shell command history an environment variable can be set in user profile –

MOSQUITTO_PASSWORD=<password>

Command line connect string references environment password variable

mosquitto_pub -h localhost -t test.out -m "test message #3" -u mqtt -P $MOSQUITTO_PASSWORD

Mosquitto SSL setup

Mosquitto man page has information on SSL and TLS setup.

Firewall port 8883 is opened (production deployment should restrict connection to known clients)

sudo ufw allow from any to any port 8883 proto tcp

To use self signed SSL certificates we create a Certificate Authority (CA) key –

sudo openssl req -new -x509 -days 360 -extensions v3_ca -keyout ca.key -out ca.crt

Next we generate and sign certificate for MQTT server, noting that key encryption is not supported –

sudo openssl genrsa -out server.key 2048
sudo openssl req -out server.csr -key server.key -new
sudo openssl x509 -req -in server.csr -CA ca.crt -CAkey ca.key -CAcreateserial -out server.crt -days 360

Finally we create a certificate for MQTT client –

sudo openssl genrsa -des3 -out client.key 2048
sudo openssl req -out client.csr -key client.key -new
sudo openssl x509 -req -in client.csr -CA ca.crt -CAkey ca.key -CAcreateserial -out  client.crt -days 360

Key Points –

  • Server key must not use key encryption or Mosquitto raises error:
	1594334396: Error: Unable to load server key file "/etc/mosquitto/certs/server.key". Check keyfile.
	1594334396: OpenSSL Error[0]: error:2807106B:UI routines:UI_process:processing error
	1594334396: OpenSSL Error[1]: error:0906406D:PEM routines:PEM_def_callback:problems getting password
	1594334396: OpenSSL Error[2]: error:0906A068:PEM routines:PEM_do_header:bad password read
	1594334396: OpenSSL Error[3]: error:140B0009:SSL routines:SSL_CTX_use_PrivateKey_file:PEM lib

  • Common Name (CN) must be different across each of CA, Server and Client certs for example –

Common Name (e.g. server FQDN or YOUR name) []:
CA: selfcert.local
Server: mqtt.steveio.com
Client: ESP32

Otherwise following errors occur –

Server:
1594327583: OpenSSL Error: error:14094418:SSL routines:ssl3_read_bytes:tlsv1 alert unknown ca

Client:
stevee@ideapad-530S:~/ssl_cert$ sudo mosquitto_pub --insecure --cafile /etc/mosquitto/ca_certificates/ca.crt --cert /etc/mosquitto/certs/client.crt --key /etc/mosquitto/certs/client.key -h mqtt.steveio.com -p 8883 -q 1 -t "test" -i anyclientID --tls-version tlsv1.3 -m "Hello" -d
Enter PEM pass phrase:
Client anyclientID sending CONNECT
OpenSSL Error[0]: error:1416F086:SSL routines:tls_process_server_certificate:certificate verify failed
Error: A TLS error occurred.

Mosquitto Broker SSL Configuration

Mosquitto Broker SSL default.conf Listener Configuration

listener 8883 mqtt.steveio.com
cafile /etc/mosquitto/ca_certificates/ca.crt
keyfile /etc/mosquitto/certs/server.key
certfile /etc/mosquitto/certs/server.crt

Restart Mosquitto service and check logs

sudo service mosquitto restart
sudo cat /var/log/mosquitto/mosquitto.lo

1596376328: mosquitto version 1.6.10 starting
1596376328: Config loaded from /etc/mosquitto/mosquitto.conf.
1596376328: Opening ipv6 listen socket on port 1883.
1596376328: Opening ipv4 listen socket on port 1883.
1596376328: Opening ipv4 listen socket on port 8883.

Testing SSL connection with openSSL client

# use openssl client to test connection
sudo openssl s_client -connect mqtt.steveio.com:8883 -CAfile /etc/mosquitto/ca_certificates/ca.crt

SSL Publish using Mosquitto broker command line

sudo mosquitto_pub --cafile /etc/mosquitto/ca_certificates/ca.crt --cert /etc/mosquitto/certs/client.crt --key /etc/mosquitto/certs/client.key -h mqtt.steveio.com -p 8883 -q 1 -t "test" -i anyclientID --tls-version tlsv1.3 -m "Hello" -d -u mqtt -P $MOSQUITTO_PASSWORD 

Enter PEM pass phrase:
Client anyclientID sending CONNECT
Client anyclientID received CONNACK (0)
Client anyclientID sending PUBLISH (d0, q1, r0, m1, 'test', ... (5 bytes))
Client anyclientID received PUBACK (Mid: 1, RC:0)
Client anyclientID sending DISCONNECT

SSL Subscribe using Mosquitto broker

sudo mosquitto_sub --cafile /etc/mosquitto/ca_certificates/ca.crt --cert /etc/mosquitto/certs/client.crt --key /etc/mosquitto/certs/client.key -h mqtt.steveio.com -p 8883 -q 1 -t "test" -i anyclientID --tls-version tlsv1.3 -d -u mqtt -P $MOSQUITTO_PASSWORD

MQTT Offline Clients – Store / Persist / Forward

A feature within MQTT specification is store / forward, enabling message delivery to offline or clients connecting only on a scheduled basis. Normally, messages are delivered immediately to all topic subscribers. When clients setup a persistent session, messages with QOS level 1 or 2 are queued for delivery in the event they are offline.

Requirements:

  • QoS level: 1 / 2
  • Fixed client ID
  • Always connect with clean_session=False
  • Subscriptions must be made with QoS>0
  • Messages published must have QoS>0

Example Store / Forward Message Flow

Subscriber specifies qos level 1, client identity (-i), clean flag (-c)

mosquitto_sub -h localhost -t test.out -u mqtt -P $MOSQUITTO_PASSWORD -q 1 -c -i broker

Client -c5646 sending CONNECT
Client -c5646 received CONNACK
Client -c5646 sending SUBSCRIBE (Mid: 1, Topic: test.out, QoS: 1)
Client -c5646 received SUBACK
Subscribed (mid: 1): 1

Publisher sends msg #1 to online client

mosquitto_pub -h localhost -t test.out -m "test message #1" -u mqtt -P $MOSQUITTO_PASSWORD -d -q 1 -i client

Client -c8212 sending CONNECT
Client -c8212 received CONNACK
Client -c8212 sending PUBLISH (d0, q1, r0, m1, 'test.out', ... (15 bytes))
Client -c8212 received PUBACK (Mid: 1)
Client -c8212 sending DISCONNECT

Subscriber (online) receives message #1

Client -c8186 received PUBLISH (d0, q1, r0, m1, 'test.out', ... (15 bytes))
Client -c8186 sending PUBACK (Mid: 1)
test message #1

Subscriber disconnects, publisher sends message #2

mosquitto_pub -h localhost -t test.out -m "test message #2" -u mqtt -P $MOSQUITTO_PASSWORD -d -q 1 -i client

Subscriber connects, receiving message sent during offline

mosquitto_sub -h localhost -t test.out -u mqtt -P $MOSQUITTO_PASSWORD -d -q 1 -c -i broker

Client broker sending CONNECT
Client broker received CONNACK
Client broker sending SUBSCRIBE (Mid: 1, Topic: test.out, QoS: 1)
Client broker received PUBLISH (d0, q1, r0, m2, 'test.out', ... (15 bytes))
Client broker sending PUBACK (Mid: 2)
test message #2
Client broker received SUBACK
Subscribed (mid: 1): 1

There is a more detailed examination of persistence and store / forward here.

As MQTT matures it would be useful to see tools like Postfix qshape emerge for bottleneck and message queue administration.