Categories
arduino Coding Embedded Internet of Things Python weather station

Sunrise / Sunset Time visualised with Python, Pandas & Matplotlib

We can use Python Pandas & Mathplotlib libraries to quickly visualise sunrise / sunset timing data, but how to plot time as a number on a graph?

Sunrise / Sunset times are computed on my Arduino Weather Station using SunMoon library ( https://github.com/sfrwmaker/sunMoon ). Incredible that such a tiny 8 bit machine architecture can run this relatively complex algorithm with ease.

Data is logged every 30 mins to daily files stored on SD card in JSON text format.

stevee@ideapad-530S:~/Arduino/projects$ ls  ./data/weather/*.TXT | head -3
./data/weather/20200816.TXT
./data/weather/20200817.TXT
./data/weather/20200818.TXT

Once files are transferred to a Linux computer, a bash script pre-processor (a useful technique on large datasets where syntax modifications are necessary) is used to reformat data as valid array of JSON objects –

stevee@ideapad-530S:~/Arduino/projects$ cat weather_preprocess.bash
#!/bin/bash

for f in data/weather/*.TXT; do
    j="${f%.*}"
    grep "^\[" $f | sed 's/\[//g' | sed 's/\]/,/g' | sed '$ s/.$//' | sed '$ s/.$//'  > $j.json
    sed -i '1 i\\[' $j.json
    echo "]" >> $j.json
    echo $j.json
done

JSON data is an array of objects where each row represents a single log entry indexed by unix timestamp.

Columns represent sensor & computed data – temperature, humidity, air pressure, sun elevation, surise / sunset time and moon phase.

stevee@ideapad-530S:~/Arduino/projects/python$ head -20 ../data/weather/20201015.json
[
{"ts":1602720026,"t":15.5,"h":88,"l":986,"p":102141,"t2":18.8,"a":0.414837,"w":697,"el":-47.86353,"az":2.618189,"lat":50.7192,"lon":-1.8808,"sr":"07:31","ss":"18:14","mn":28},
{"ts":1602720059,"t":15.5,"h":88,"l":988,"p":102140,"t2":18.8,"a":0.166463,"w":692,"el":-47.85925,"az":2.82748,"lat":50.7192,"lon":-1.8808,"sr":"07:31","ss":"18:14","mn":28},
...

Assuming a working Python (v2x) installation and dependencies (Pandas, Mathplorlib, Datetime) are present, we include required libraries and import data from file using Pandas creating a DataFrame in memory table structure –

import os
import json

import matplotlib as mpl
import matplotlib.dates as mdates
import matplotlib.pyplot as plt
import matplotlib.dates as mdates
import pandas as pd
from datetime import datetime as dt

days_to_extract = 90;
path = "../data/weather/"
files = []
frames = []

### Data file path and file format 
for (path, dirs, f) in os.walk(path):
    files = [ fi for fi in f if fi.endswith(".json") ]

### Load JSON data
def load_json_data(filepath, frames):
    with open(filepath) as f:
        d = json.load(f)
        df = pd.DataFrame(d)
        frames.append(df)

### process n days datafiles
for f in files:
    filename = path+f
    bits = os.path.splitext(f)
    datestr = bits[0]
    dtm = datetime.strptime(datestr, '%Y%m%d')
    if dtm >= datetime.now()-timedelta(days=days_to_extract):
    load_json_data(filename,frames)

# complete dataset as DataFrame
df = pd.concat(frames)

In dataset although frequency for sunrise / set times is daily, these are actually logged every 30 mins, creating many duplicate entries –

print df['sr'];

datetime
2021-01-19 00:00:26 17:37
2021-01-19 00:00:59 17:37
2021-01-19 00:01:26 17:37
2021-01-19 00:01:59 17:37
2021-01-19 00:02:26 17:37

To get one entry per day sunrise/set timing column data is resampled to daily frequency ( .resample(‘1D’) ) and any null rows are dropped with .dropna().

This is equivilent to a relational database roll-up or group by query.

sr = df['sr'].resample('1D').min().dropna()
ss = df['ss'].resample('1D').min().dropna()

Now we have a single daily time entry row indexed by date.

2021-01-18 17:35
2021-01-19 17:37
2021-01-20 17:38
2021-01-21 17:40
2021-01-22 17:41
Name: ss, Length: 93, dtype: object

To plot times on Y-Axis values from Pandas Series are extracted into a simple 2d array list.

We call datestr2num() from mathplotlib.dates ( converts date/time string to the proleptic Gregorian ordinal ) to format time as a number –

srt = np.array(sr.values.tolist())
srt = mpl.dates.datestr2num(srt)
sst = np.array(ss.values.tolist())
sst = mpl.dates.datestr2num(sst)

giving values that can be plotted –

[737824.30416667 737824.30486111 737824.30625 737824.30763889
737824.30833333 737824.30972222 737824.31111111 737824.31180556
…]

A linear scatter plot can then be rendered with a few formatting options specified

fig = plt.figure()
ax = fig.add_subplot(111)
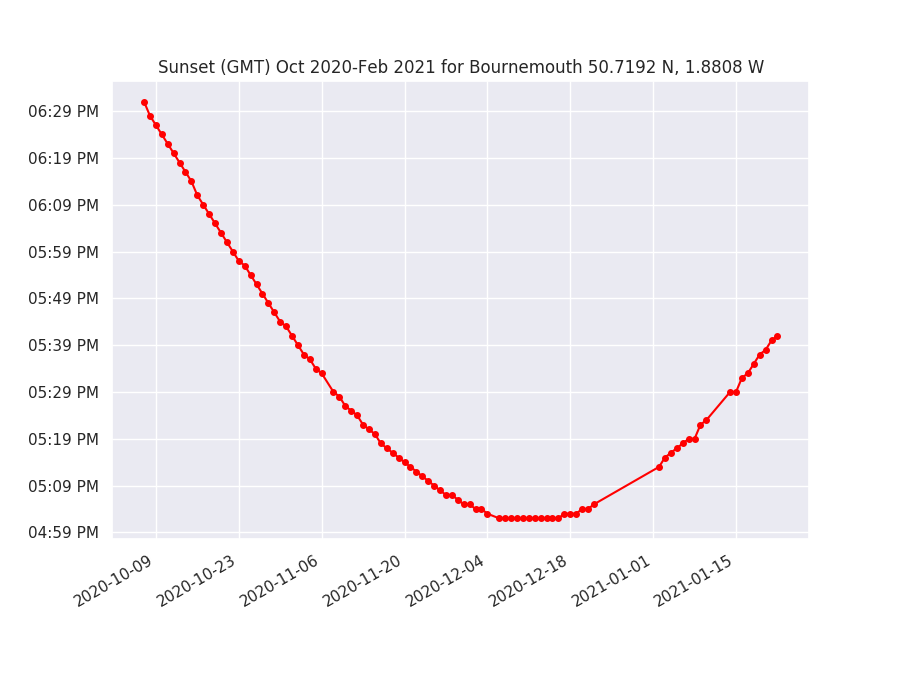
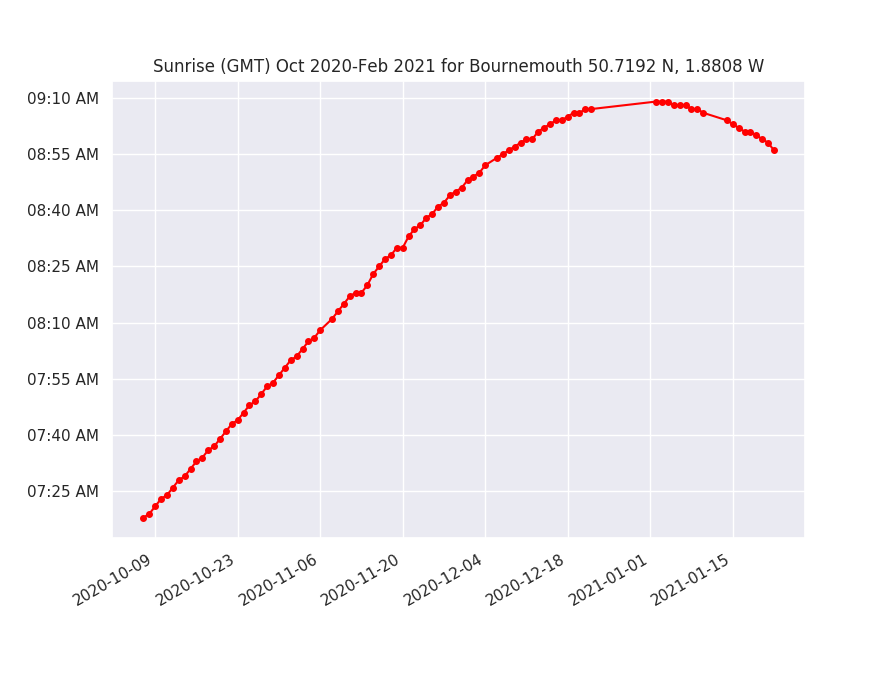
ax.set_title('Sunrise (GMT) Oct 2020-Feb 2021 for Bournemouth 50.7192 N, 1.8808 W')
ax.plot_date(sr.index, srt, '-ok', color='red', markersize=4)
ax.yaxis_date()
ax.yaxis.set_major_formatter(mdates.DateFormatter('%I:%M %p'))
fig.autofmt_xdate()

The result is a curve which shows day light hours being influenced as Mid Winter solstice (shortest day) Dec 21st is passed.

Sunrise times visualised as scatter plot
Sunset times

For more info and examples of real time series data charting in Python: https://www.dataquest.io/blog/tutorial-time-series-analysis-with-pandas/

Discussion of Arduino Sunrise / Sunset libraries: http://www.steveio.com/2020/09/03/sunrise-sunset-is-arduino-ahead-of-its-time/

Categories
arduino C/C++ esp8266 Internet of Things Python Software WebSockets

WebSocket Binary – ESP8266 to Web Browser

Binary wire protocols are long established for embedded machine to machine (M2M) communication, network applications and wireless radio data transmission.

Internet of Things (IOT) devices, real time sensors, robotics, smart home of industrial machine control data also demand efficient, low latency & lightweight data communications.

WebSockets ( RFC6455 ) protocol brings native support for binary framed messaging to web browser clients, offering a compact lightweight format for fast and efficient endpoint messaging.

Why use binary format data messaging?

Compared to serialisation of more complex text based wire formats, binary is lightweight and requires minimal storage / bandwidth and processing.

Taking an example key/value command data message:

// JSON encoding
{"cmd":101,"value":180}
23 * 2 = 46 bytes

// CSV plain text encoding
101,180\n
9 * 2 = 18 bytes 

// Binary
101 180
int (4 bytes) + int(4 bytes)
4+4 = 8 bytes

In case of high performance applications supporting a large number of clients or very high frequency of data exchange, minimising data size, bandwidth and processing becomes an important priority.

Binary wire protocols are long established for embedded M2M messaging

Taking as a simple example an embedded ESP8266 WiFi device, message gateway and web browser client, data serialisation and bidirectional binary framed WebSocket data exchange are demonstrated.

ESP8266 Byte Array Serialisation

Internally data is represented in embedded microcontrollers as ones and zeros, sequences of bits arranged in addressable memory.

Higher level programming language abstraction provides human readable textual labels and in case of C/C++ associated type information.

Lets define a mixed type data structure that could be some kind of sensor or message data payload –

    // define mixed type data struct
    struct Data
    {
        int id;
        float v1;
        float v2;
        unsigned long v3;
        char v4[20];
    };

    struct Data data;

    // populate data values
    data.id = 67;
    data.v1 = 3.14157;
    data.v2 = -7.123;

    unsigned long ts = millis();
    data.v3 = ts;

    char c[20] = "N NE E SE S SW W NW";
    strncpy(data.v4, c, 20);

To access underlying bytes, a pointer to data structure address is created –

    uint8_t * bytePtr = (uint8_t*) &data;    
    webSocket.sendBIN(bytePtr, sizeof(data));

Data pointer and length are passed to WebSocket send method “webSocket.sendBIN()”, byte range is read, packaged (framed) according to protocol specification and written to TCP/IP network socket.

Hexidecimal and Binary text representation of in memory data structure can also be displayed –

void printBytes(const void *object, size_t size)
{
    const uint8_t * byte;
    for ( byte = (uint8_t *) object; size--; ++byte )
    {
        Serial.print(*byte, HEX);
        Serial.print("\t");
        Serial.println(*byte, BIN);
    }
    Serial.println('\n');
}

Python WebSocket Server

A Python3 middleware hosts WebSocket server and acts as a message relay gateway.

Binary WebSocket messages can be decoded in Python, the struct module performs conversions between Python data types and C structs –

async def wsApi(websocket, path):
    try:
        async for message in websocket:
            print('User-Agent: '+ websocket.request_headers['User-Agent'])
            print('Sec-WebSocket-Key: '+websocket.request_headers['Sec-WebSocket-Key'])
            print('MessageType: '+str(type(message)))
            print(message);
            print('Hex: '+message.hex());

            if isinstance(message, (bytes, bytearray)):

                i = message[:4];
                print(i);
                tuple_of_data = struct.unpack("i", i)
                print(tuple_of_data)

                tuple_of_data = struct.unpack_from("f", message, 4)
                print(tuple_of_data)

                tuple_of_data = struct.unpack_from("f", message, 8)
                print(tuple_of_data)

                tuple_of_data = struct.unpack_from("i", message, 12)
                print(tuple_of_data)

                tuple_of_data = struct.unpack_from("20s", message, 16)
                print(tuple_of_data[0])

                ## forward message
                await asyncio.wait([user.send(message) for user in USERS])

To index into byte array and read a number of bytes according to data type being unpacked Python’s array slice method “i = message[:4]” can be used where [<from>:<to>] specifies start/end positions.

Method struct.unpack_from() is another approach, taking as parameters a format character specifying data type (“i” – integer, “f” – float), data buffer and an index (in bytes) to read from.

Here is decoded binary message output including some WebSocket headers –

User-Agent: arduino-WebSocket-Client
Sec-WebSocket-Key: zoJ0aR/5XunSvEKKcUkWfQ==
MessageType: <class 'bytes'>
b'C\x00\x00\x00|\x0fI@\x9e\xef\xe3\xc0\xb9\x17\x00\x00N NE E SE S SW W NW\x00'
Hex: 430000007c0f49409eefe3c0b91700004e204e45204520534520532053572057204e5700
b'C\x00\x00\x00'
(67,)
(3.1415700912475586,)
(-7.123000144958496,)
(6073,)
b'N NE E SE S SW W NW\x00'

Web Browser – Binary Encode/Decode in JavaScript

In web browser, JavaScript primitives Blob, ArrayBuffer and TypedArray perform a similar conversion.

Firstly, received WebSocket messages (event object) can be debugged to console –

 websocket.onmessage = function (event) {
    console.log(event);

Binary framed data payload is reported as type “Blob” (raw data) of length 36 bytes –

Chrome Developer Tools console log for WebSocket Binary message receieve event

To de-serialise message, raw data Blob is converted asynchronously using FileReader API to ArrayBuffer, a generic fixed length binary data buffer –

    if (event.data instanceof Blob)  // Binary Frame
    {
      // convert Blob to ArrayBuffer
      var arrayPromise = new Promise(function(resolve) {
          var reader = new FileReader();

          reader.onloadend = function() {
              resolve(reader.result);
          };

          reader.readAsArrayBuffer(event.data);
      });

When promise is fulfilled, ArrayBuffer can be read using typed views (Uint32Array, Uint32Array) for integer (including long) and float types, TextDecoder API is used to decode character array –

arrayPromise.then(function(buffer) {

          // Decoding Binary Packed Data

          // int (4 bytes)
          var arrInt = new Uint32Array(buffer);
          var id = arrInt[0];
          console.log("id:"+id);

          // 2x float (4 bytes)
          var arrFloat = new Uint32Array(buffer,4);
          var v1 = arrFloat[0];
          var v2 = arrFloat[1];
          console.log("v1: "+v1);
          console.log("v2: "+v2);

          // long (4 bytes)
          var v3 = arrInt[3];
          console.log("v3:"+v3);

          // character data (20 bytes)
          var uint8Array = new Uint8Array(buffer,16);
          var string = new TextDecoder("utf-8").decode(uint8Array);
          console.log(string);
      });

JavaScript Binary Data Encoding

Binary data can also be encoded from native JavaScript. TypedArrays created for each data type – integer, float, long and character array are populated and packed into an ArrayBuffer suitable for use as WebSocket data payload –

console.log("Binary Encode example");

// Binary Encode example
var buffer = new ArrayBuffer(36)
var arrInt =   new Uint32Array(buffer, 0, 1);
arrInt[0] = 67;
var arrFloat = new Float32Array(buffer, 4, 2);
arrFloat[0] = 3.14157;
arrFloat[1] = -7.123;

var arrInt2 =   new Uint32Array(buffer, 12, 1);
arrInt2[0] = Date.now();

var uint8Array = new Uint8Array(buffer,16);
var charBuffer = new TextEncoder("utf-8").encode("N NE E SE S SW W NW");

for(var i = 0; i<charBuffer.length; i++)
{
  uint8Array[i] = charBuffer[i];
}

// send binary data
websocket.send(buffer);

At message gateway, logs demonstrate parity between data packed by embedded device and those sent from web browser client –

User-Agent: Mozilla/5.0 (X11; Linux x86_64) AppleWebKit/537.36 (KHTML, like Gecko) Chrome/69.0.3497.100 Safari/537.36
Sec-WebSocket-Key: 1TD9Zp71cMTivUbj+QSx5w==
MessageType: <class 'bytes'>
b'C\x00\x00\x00|\x0fI@\x9e\xef\xe3\xc0\x07\x1c\xff\x91N NE E SE S SW W NW\x00'
Hex: 430000007c0f49409eefe3c0071cff914e204e45204520534520532053572057204e5700
b'C\x00\x00\x00'
(67,)
(3.1415700912475586,)
(-7.123000144958496,)
(-1845552121,)
b'N NE E SE S SW W NW\x00'

Limitations / Drawbacks

Compared to UTF-8 text formats (XML, JSON) packed binary data has significant disadvantages –

  • legibility – text based key/value formats are easy to read, manipulate and maintain
  • fixed frame boundaries – using positional byte sequence indexes means even small changes to message structure, size or field position require updates to consumer client code
  • endianess / alignment / padding must be maintained consistently, compiler and platform implementation differences may occur

Security

WebSockets Secure (WSS) offers transport layer security (TLS) to encrypt data streams. An authentication and authorisation strategy (challenge/response password, token or certificate based) for client identification should also be deployed. Cryptographic message digest signing or encryption might also be used as extra protection for critical data.

Categories
Coding Internet of Things Python Software Uncategorized

Arduino Serial to Websocket in Python

What if we would like to publish data transmitted over RS232 Serial from an embedded Arduino device to a WebSocket browser client?

When prototyping a cable serial connection is very convenient as RF or networking modules may not yet be implemented. How do we get serial data to provision a cloud API service or web browser interface?

We can achieve this easily with Python and PySerial library:

#!/usr/bin/python

import serial
import asyncio
import datetime
import random
import websockets

ser = serial.Serial(
port='/dev/ttyUSB0',\
baudrate=115200,\
parity=serial.PARITY_NONE,\
stopbits=serial.STOPBITS_ONE,\
bytesize=serial.EIGHTBITS,\
timeout=0)

print("connected to: " + ser.portstr)


async def tx(websocket, path):
    line = []
    while True:
        for i in ser.read():
            c = chr(i)
            line.append(c)
            if c == '\n':
                print(''.join(line))
                await websocket.send(''.join(line))
                line = []
                break

start_server = websockets.serve(tx, "127.0.0.1", 5678)

asyncio.get_event_loop().run_until_complete(start_server)
asyncio.get_event_loop().run_forever()

ser.close()

Here is a more detailed example of reading serial port data in C language on Linux Platform –

https://blog.mbedded.ninja/programming/operating-systems/linux/linux-serial-ports-using-c-cpp/

Categories
arduino Coding Internet of Things nodejs Python Software

MQTT to Websockets with ESP32, NodeJS and D3.js

MQTT is a lightweight messaging protocol suitable for embedded and IOT devices.

Websockets ( RFC6455 – https://tools.ietf.org/html/rfc6455 ) is socket programming for internet, an evolution of browser / web server HTTP enabling real-time bidirectional data exchange and binary messaging.

How do we interface a MQTT enabled IOT sensor device with a web browser interface displaying a real time graph chart?

A real time web based barometric air pressure chart interface created with WebSockets and D3.js

Introduction to WebSockets – Real Time TCP Sockets for Internet

With modern browser engines and responsive web UI technologies built on HTML5, SVG and JavaScript frameworks, sophisticated visualisation, display and dashboard reporting capabilities have emerged.

Responsive Web UI runs in any browser installed device – laptop, dekstop, tablet or mobile, without need to install additional software or prepare application code for specific device architectures.

HTTP browser clients essentially implement a polling request/response technique for retrieving and updating HTML format webpages.

Due to need to establish a connection for each new request, HTTP is not well suited to real time or high volume messaging, charting or visualisation applications.

Although AJAX (asynchronous JavaScipt XML) and REST, SOAP API programming overcome this to a certain extent these methods are relatively inefficient for some use cases due to protocol overhead.

With Websockets, TCP network socket programming becomes possible in a browser client application.

Clients can establish a network socket connection, this channel remains open and two-way data exchange including binary messaging formats takes place.

Sockets are well established in UNIX and Windows OS client/server programming, but are relatively new to the web.

Arduino ESP32 Barometer Sensor MQTT Device

An ESP32 microcontroller with BMP280 environmental sensor and OLED LCD display

An environmental sensor based on an Expressif ESP32 micro-controller and BMP280 Bosch sensor reads air pressure, temperature and altitude –

#include <Adafruit_BMP280.h>

Adafruit_BMP280 bmp;

void setup() {

  if (!bmp.begin()) {
    Serial.println(F("Could not find a valid BMP280 sensor, check wiring!"));
    while (1);
  }
  
  /* Default settings from datasheet. */
  bmp.setSampling(Adafruit_BMP280::MODE_NORMAL,     /* Operating Mode. */
                  Adafruit_BMP280::SAMPLING_X2,     /* Temp. oversampling */
                  Adafruit_BMP280::SAMPLING_X16,    /* Pressure oversampling */
                  Adafruit_BMP280::FILTER_X16,      /* Filtering. */
                  Adafruit_BMP280::STANDBY_MS_500); /* Standby time. */  

}

void loop() {

  Serial.print(F("Temperature = "));
  Serial.print(bmp.readTemperature());
  Serial.println(" *C");

  Serial.print(F("Pressure = "));
  Serial.print(bmp.readPressure()/100); //displaying the Pressure in hPa, you can change the unit
  Serial.println(" hPa");

  Serial.print(F("Approx altitude = "));
  Serial.print(bmp.readAltitude(1019.66)); //The "1019.66" is the pressure(hPa) at sea level in day in your region
  Serial.println(" m");                    //If you don't know it, modify it until you get your current altitude

  display.clearDisplay();
  float t = bmp.readTemperature();           //Read temperature in C
  float p = bmp.readPressure()/100;         //Read Pressure in Pa and conversion to hPa
  float a = bmp.readAltitude(1019.66);      //Calculating the Altitude, the "1019.66" is the pressure in (hPa) at sea level at day in your region

  delay(2000);
}

Data is communicated over Wifi to an MQTT messaging server.

On Arduino we can use PubSub MQTT Library ( https://github.com/knolleary/pubsubclient ).

To set this up, first we define Wifi and MQTT server credentials and topic id (channels) and define a transmit data buffer:

const char* ssid = "__SSID__";
const char* pass = "__PASS__";

IPAddress mqtt_server(192, 168, 1, 127); // local LAN Address
const char* mqtt_user = "mqtt";
const char* mqtt_password = "__mqttpassword__";

const char* mqtt_channel_pub = "esp32.out";
const char* mqtt_channel_sub = "esp32.in";

WiFiClient wifi;
PubSubClient mqtt(wifi);

#define MSG_BUFFER_SIZE (128)
char msg[MSG_BUFFER_SIZE];

Then we setup Wifi connection:

  WiFi.begin(ssid, password);

  while (WiFi.status() != WL_CONNECTED) {
    delay(500);
    Serial.print(".");
  }

  Serial.println("");
  Serial.println("WiFi connected");
  Serial.print("Connecting to ");
  Serial.println(ssid);
  Serial.println("IP address: ");
  Serial.println(WiFi.localIP());

And attempt to connect to MQTT broker, sending a hello message:

void loop() {
  
  while (!mqtt.connected()) {
    Serial.print("Attempting MQTT connection...");
    // Create a random client ID
    String clientId = "ESP8266Client-";
    clientId += String(random(0xffff), HEX);
    // Attempt to connect
    if (mqtt.connect(clientId.c_str(), mqtt_user, mqtt_password)) {
      Serial.println("connected");
      // Once connected, publish an announcement...
      mqtt.publish(mqtt_channel_pub, "hello ESP32");
      // ... and resubscribe
      mqtt.subscribe(mqtt_channel_sub);
    } else {
      Serial.print("failed, rc=");
      Serial.print(mqtt.state());
      Serial.println(" try again in 5 seconds");
      // Wait 5 seconds before retrying
      delay(5000);
    }
  }

  mqtt.loop();
}

After reading, we can transmit sensor values (Temperature T, Pressure P, Altitude A) on ESP32:

  snprintf(msg, MSG_BUFFER_SIZE, "%.2f,%.2f,%.2f", t, p, a);

  Serial.print("Publish message: ");
  Serial.println(msg);
  mqtt.publish(mqtt_channel_pub, msg);

MQTT to WebSocket RFC6455 – Node.JS Relay

On server we require a relay to subscribe for MQTT messages on sensor device channel, establish a WebSocket and write data to connected browser clients.

An implementation in NodeJS requires WS, MQTT and events libraries:

// setup Websocket Server
const WebSocket = require('ws');
var ws_host = "192.168.1.127";
var ws_port = "8080";
const wss = new WebSocket.Server({ host: ws_host, port: ws_port });
var ws = null;

// Setup MQTT Client
// mqtt[s]://[username][:password]@host.domain[:port]
var mqtt = require('mqtt'), url = require('url');
var mqtt_url = url.parse(process.env.MQTT_URL || 'mqtt://192.168.1.127:1883');
var auth = (mqtt_url.auth || ':').split(':');
var url = "mqtt://" + mqtt_url.host;
var mqtt_channel_in = "esp8266.in";
var mqtt_channel_out = "esp8266.out";

var options = {
    port: mqtt_url.port,
    clientId: 'mqttjs_' + Math.random().toString(16).substr(2, 8),
    username: 'mqtt',
    password: '__mqtt_password__',
    keepalive: 60,
    reconnectPeriod: 1000,
    protocolId: 'MQIsdp',
    protocolVersion: 3,
    clean: true,
    encoding: 'utf8'
};

NodeJS is event based, when an MQTT message is received it can be forwarded to all connected WebSocket clients:

mqttClient.on('message', function sendMsg(topic, message, packet) {

  console.log(topic + ": " + message);

  var eventListeners = require('events').EventEmitter.listenerCount(mqttClient,'message');
  console.log(eventListeners + " Listner(s) listening to mqttClient message event");
  console.log(mqttClient.rawListeners('message'));

  wss.clients.forEach(function each(ws) {
    if (ws.isAlive === false) return ws.terminate();
    console.log(data);
    ws.send(data+" ");
  });

});

MQTT allows many subscribers to receive topic messages.

Python Eclipse Paho MQTT client with Mongo DB

A client based on Eclipse Paho ( https://www.eclipse.org/paho/ ) developed in Python might add persistence by writing to a Mongo DB datastore:

### Python MQTT client
### Subscribes to an MQTT topic receiving JSON format messages in format:
###    [{"ts":1586815920,"temp":22.3,"pressure":102583,"alt":76}]
###
### Writes receieved JSON data to a mongo DB collection
###
import paho.mqtt.client as mqtt
import json
import pymongo

mqtt_server = "192.168.1.127"
mqtt_port = 1883
mqtt_keepalive = 60
mqtt_channel_out = "esp8266.out"
mqtt_channel_in = "esp8266.in"

mongo_server = "mongodb://localhost:27017/"
mongo_db = "weather"
mongo_collection = "sensorData"

def on_connect(client,userdata,flags,rc):
    print("Connected with result code:"+str(rc))
    print ("MQTT server: "+mqtt_server+", port: "+str(mqtt_port));
    print ("MQTT topic: "+mqtt_channel_out);
    client.subscribe(mqtt_channel_out)

def on_message(client, userdata, msg):
    print(msg.payload)
    parsed_json = (json.loads(msg.payload))
    res = sensorData.insert_one(parsed_json[0])

mongoClient = pymongo.MongoClient(mongo_server)
mydb = mongoClient[mongo_db]
sensorData = mydb[mongo_collection]

mqttClient = mqtt.Client()
mqttClient.connect(mqtt_server,mqtt_port,mqtt_keepalive);

mqttClient.on_connect = on_connect
mqttClient.on_message = on_message

mqttClient.loop_forever()

Web Browser Client – D3.js WebSocket Real Time Chart

WebSockets are supported natively in JavaScript by modern browser clients.

Setting up a WebSocket client, we consider re-connect attempts and parse received message data (JSON format in this example):

      <script type="text/javascript">

        var dataArr = [];

        var ws = null
        var maxReconnectAttemps = 10;
        var reconnectAttempts = 0;

        // setup WebSocket
        function setupWebSocket()
        {

          reconnectAttempts = 0;

          ws = new WebSocket('ws://192.168.1.127:8080',[]);

          ws.onopen = function () {
            console.log('WebSocket Open');
          };

          ws.onerror = function (error) {
            console.log('WebSocket Error ' + error);
          };

          ws.onmessage = function (e) {
            var rawData = e.data;
            if(rawData.trim().length > 1 &amp;&amp; rawData.trim() != "undefined")
            {
              try {

                var jsonObj = JSON.parse(rawData);
                jsonObj[0]['t'] = jsonObj[0]['t']; // temperature
                jsonObj[0]['p'] = jsonObj[0]['pressure']; // air pressure
                jsonObj[0]['a'] = jsonObj[0]['alt']; // altitude

                dataArr.push(jsonObj);

              } catch(e) {
                  console.log("Invalid JSON:"+rawData.toString());
              }
            }
          };
        }

        // check connection status every 60sec, upto maxReconnectAttemps, try reconnect
        const interval = setInterval(function checkConnectStatus() {
          if (reconnectAttempts++ < maxReconnectAttemps)
          {
            if (ws.readyState !== ws.OPEN) {
               console.log("WS connection closed - try re-connect");
               setupWebSocket();
            }
          }
        }, 60000);

        document.addEventListener("DOMContentLoaded", function() {
            setupWebSocket();
        });

Finally D3.js ( https://d3js.org/ ) is used to render chart as HTML5 / SVG.

D3.js real time barometer chart with WebSocket data provisioning

Source code and documentation can be found here:

Barometer D3.js:
http://bl.ocks.org/steveio/d549b0610fd489e6a09df8f2aa805ad3
https://gist.github.com/steveio/d549b0610fd489e6a09df8f2aa805ad3

ESP32 wifi Arduino MQTT sensor Client:
https://github.com/steveio/arduino/blob/master/ESP32SensorOLEDWifiMQTT/ESP32SensorOLEDWifiMQTT.ino

MQTT to WebSocket NodeJS relay:
https://github.com/steveio/mqttWebSocket